
Updated Best Tool to Translate YouTube Video to Arabic for 2024
Best Tool to Translate YouTube Video to Arabic
Arabic is the sixth most spoken (and understood) language in the world. According to Wikipedia, there are approximately 422 million Arabic speakers (native & non-native). If you are a content creator, translating English videos to Arabic presents an opportunity to reach such a wide audience. In this article, we will present one such tool that can help you translate video to Arabic with ease. We will also discuss common challenges in translating videos to Arabic and how our recommendation overcomes them. So, without further ado, let’s dive in.
Part 1. Common Challenges In Translating English Videos Into Arabic
Below are some common challenges you face when you want to translate videos to Arabic.
Lack of Semantic Nuances
Arabic is a very rich language with semantic nuances. As it exhibits a distinct linguistic structure, taking care of linguistic and cultural nuances is the main challenge in accurately capturing the meaning during translation.
Translating Idiomatic Expressions
Translating Arabic idioms, colloquialisms, and culturally specific expressions is difficult as these may not have direct or indirect equivalents in (say, for example) English. AI tools, in particular fail to accurately translate such sentences.
Considering Sentence Structure Variations
Maintaining coherence and natural flow is essential for effective communication. Arabic follows a very different sentence structure, complicating the translation process. For example, it is written from right to left, therefore, the translation will be read in the opposite direction.
Translating Gender and Formality
Arabic includes gender-specific pronouns and formal/informal distinctions, whereas English is more neutral towards gender. Ensuring appropriate gender and formality in translations is crucial for cultural sensitivity.
Lack of Technical Vocabulary
Technical terms may lack direct equivalents in Arabic. For example, the term “Artificial Intelligence” has no equivalent translation in Arabic. Not all AI tools will translate these terms to accurately convey the meaning. Therefore, we recommend only the best.
Part 2. Best Tool for Translating Videos Into Arabic
Translate Video Online Translate Video on Win
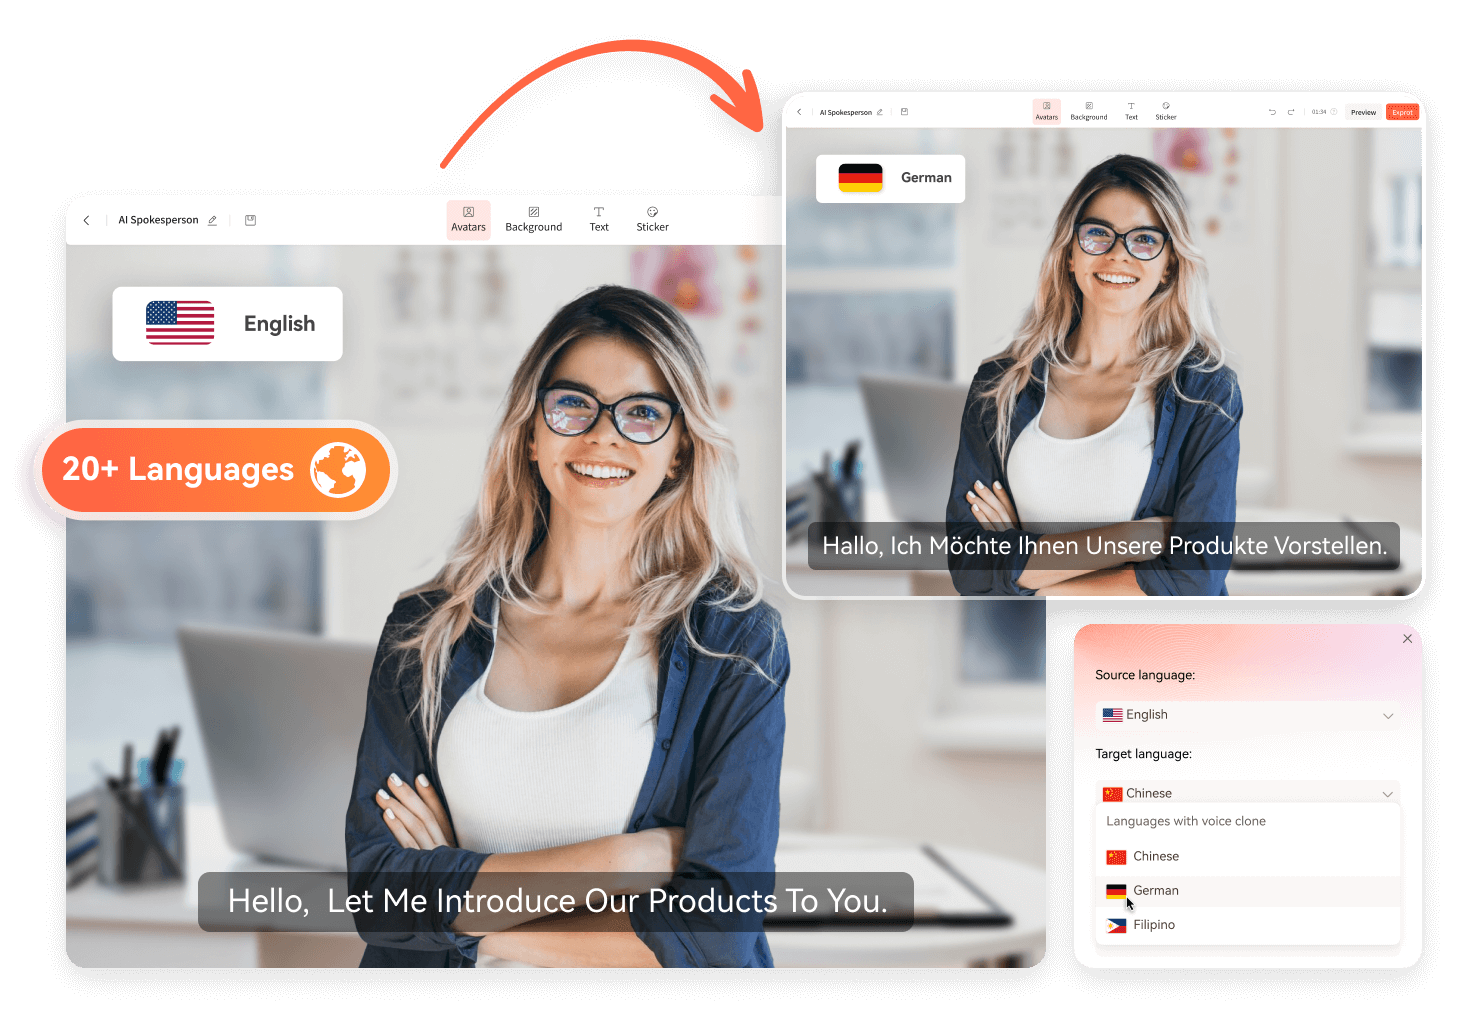
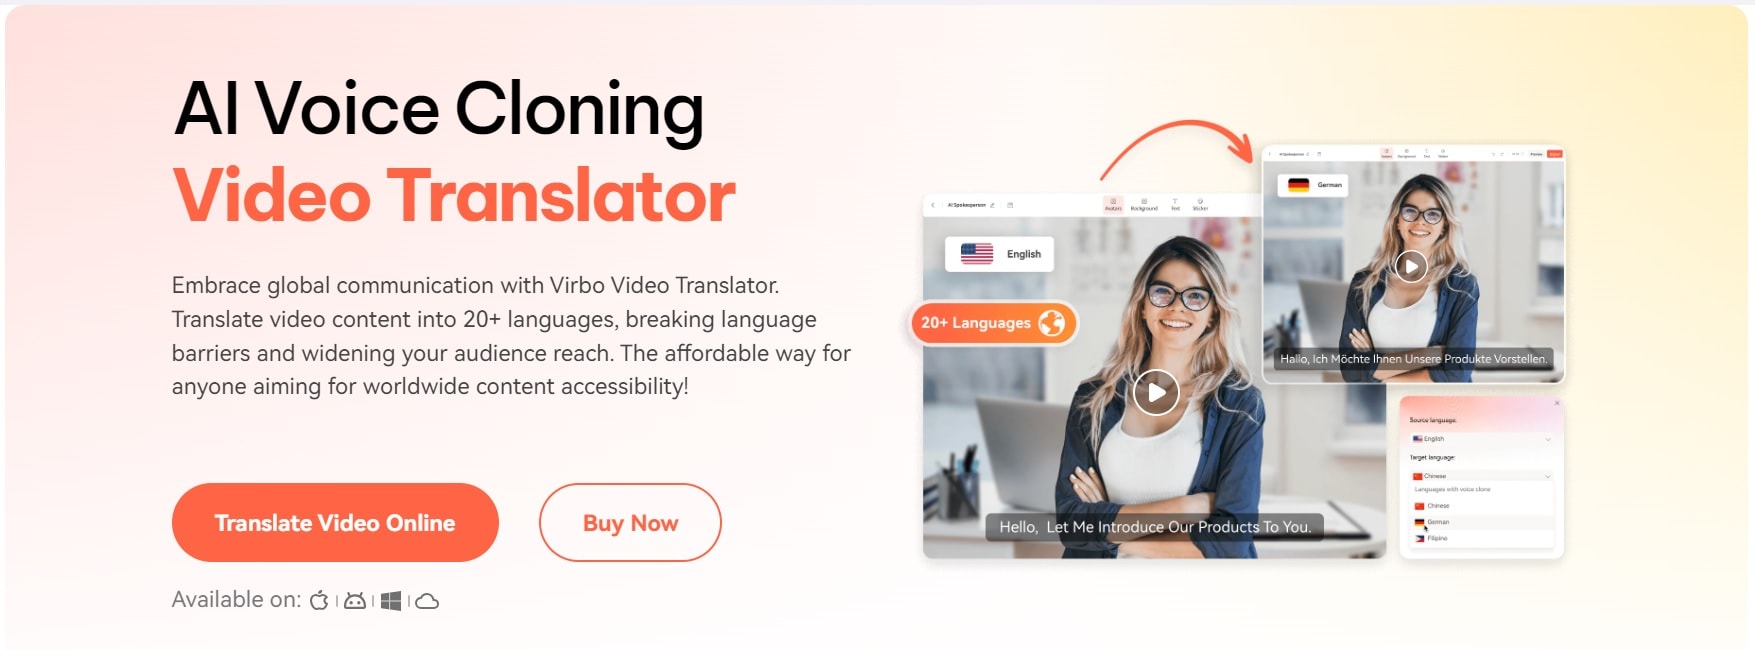
Wondershare Virbo is a groundbreaking tool that takes care of all these challenges while translating videos from Arabic to English and English to Arabic. It uses highly advanced AI machine learning algorithms and language models to analyze the context of a spoken word. It then translates and generates text in the target language. Virbo supports 20+ languages, breaking language barriers and helping you reach a wider audience. The premium plan gives you access to its entire feature set. But if you’re using the free plan, Virbo allows translations of 2-minute videos and 500 Mb files. Unfortunately, Virbo doesn’t work with YouTube links. So, if you want to translate YouTube video to Arabic, you have to download it first.
Unique Features of Virbo AI Video Translator
- Can translate video to Arabic free
- Supports 20+ Language
- Highly accurate and concise translations
- Auto-generate scripts if necessary
- AI Voice Cloning feature for Live Videos
- The lip sync precision feature is supported
Limitation
- Cannot translate YouTube videos to Arabic directly from the link (you have to download it first)
Compatibility
Wondershare Virbo is available on the following platforms:
- Windows - You can install Virbo software on your Windows computer/laptop
- Android - You can get Virbo android app from the official Google Appstore
- iOS - You can download Virbo on Apple iOS devices like iPhones and iPads
- Online - You can translate YouTube video to Arabic online
Language Support
Currently, Virbo supports the following languages:
Original Language: English, Chinese, Spanish, Arabic, Portuguese, Indonesian, French, Russian, German, Japanese, Italian, Korean, Thai, Filipino, Bengali, Turkish, Dutch, Swedish, Croatian, Romanian, Czech, Hindi, Ukrainian, Vietnamese, Malay, Slovak, Danish, Tamil, Polish, Greek, Finnish, Burmese, Urdu.
Translated Language: English, Spanish, German, Portuguese, Italian, Indonesian, Chinese, Japanese, Arabic, Filipino, Korean, Hindi, Russian, French, Dutch, Turkish, Polish, Swedish, Bulgarian, Romanian, Czech, Greek, Finnish, Malay, Slovak, Danish, Tamil, Ukrainian.
Translate Video Online Translate Video on Win
Part 3. Easy-Follow Steps to Translate Videos Into Arabic
To start translating your videos from English to Arabic, download Virbo from the official Wondershare website or just click the “Translate Video on Win” button below to download Virbo and install this video translator on your computer. You can also use the online tool or its Android or iOS app to do so. Now follow the steps below to translate video from English to Arabic.
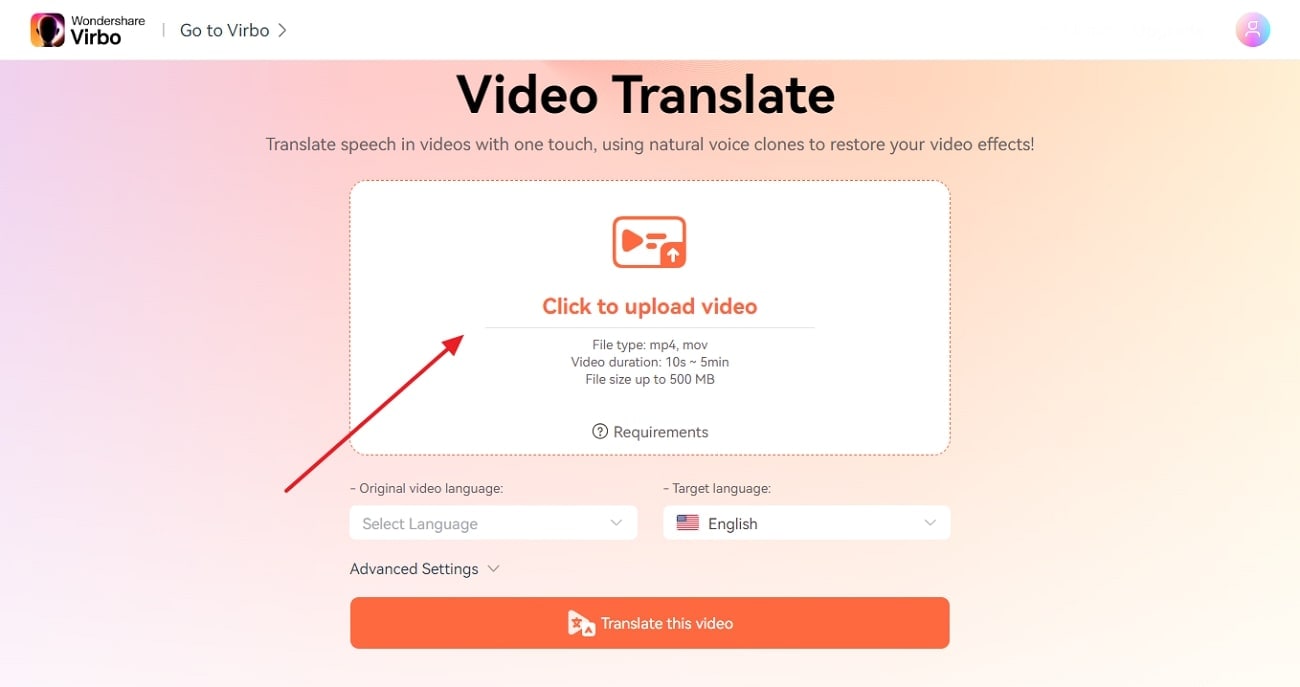
Step 1Upload Your Video
Translate Video Online Translate Video on Win
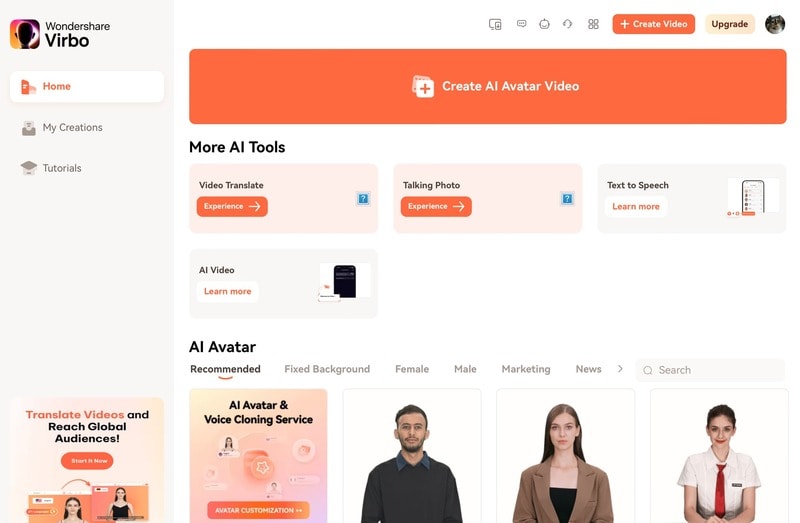
Launch Virbo and go to Video Translator Tool in the top right corner. Now, upload your video.
Note: You can choose any video between 30 seconds to 2 minutes and a 500 MB file size.
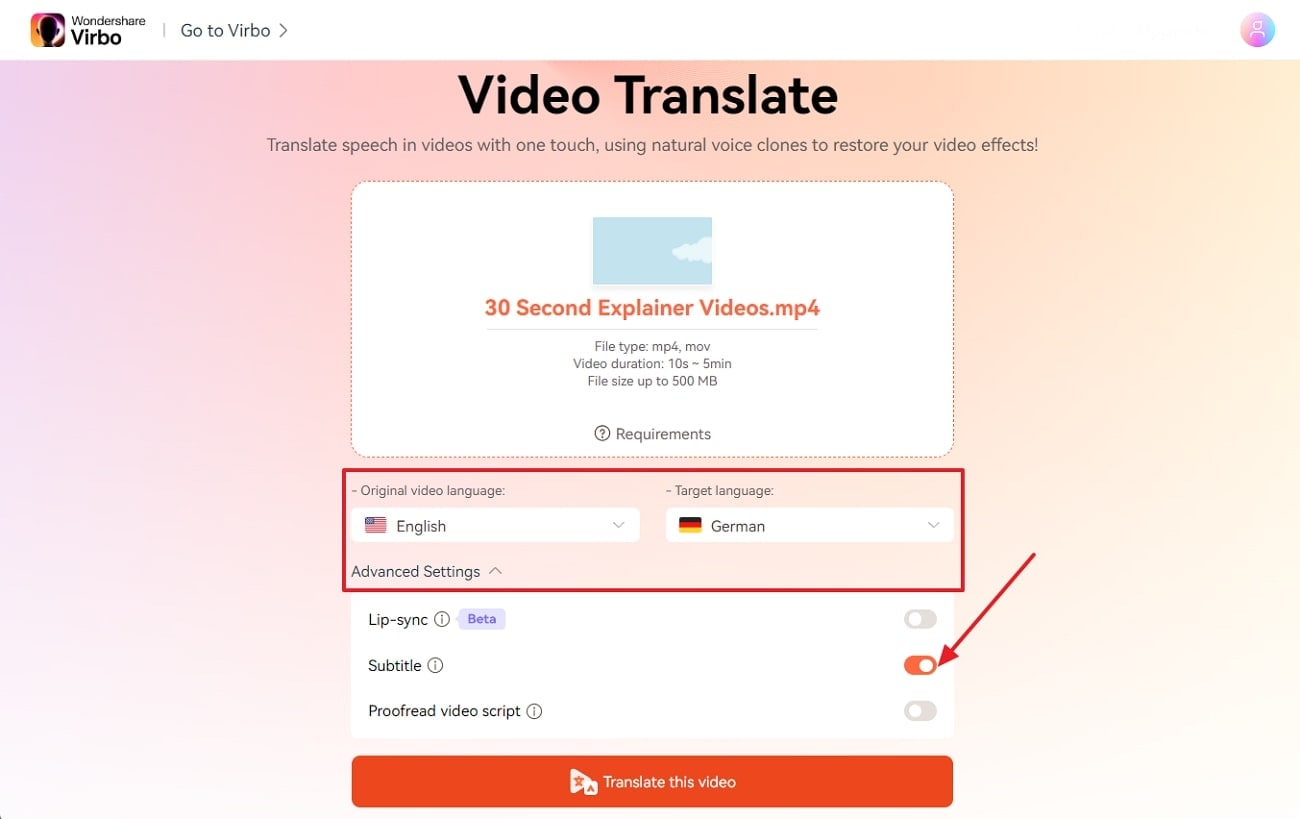
Step 2Select Source and Target Language

Once your video finishes uploading, you will see the option to select Source and Target languages. Select English as the source and Arabic as the Target language.
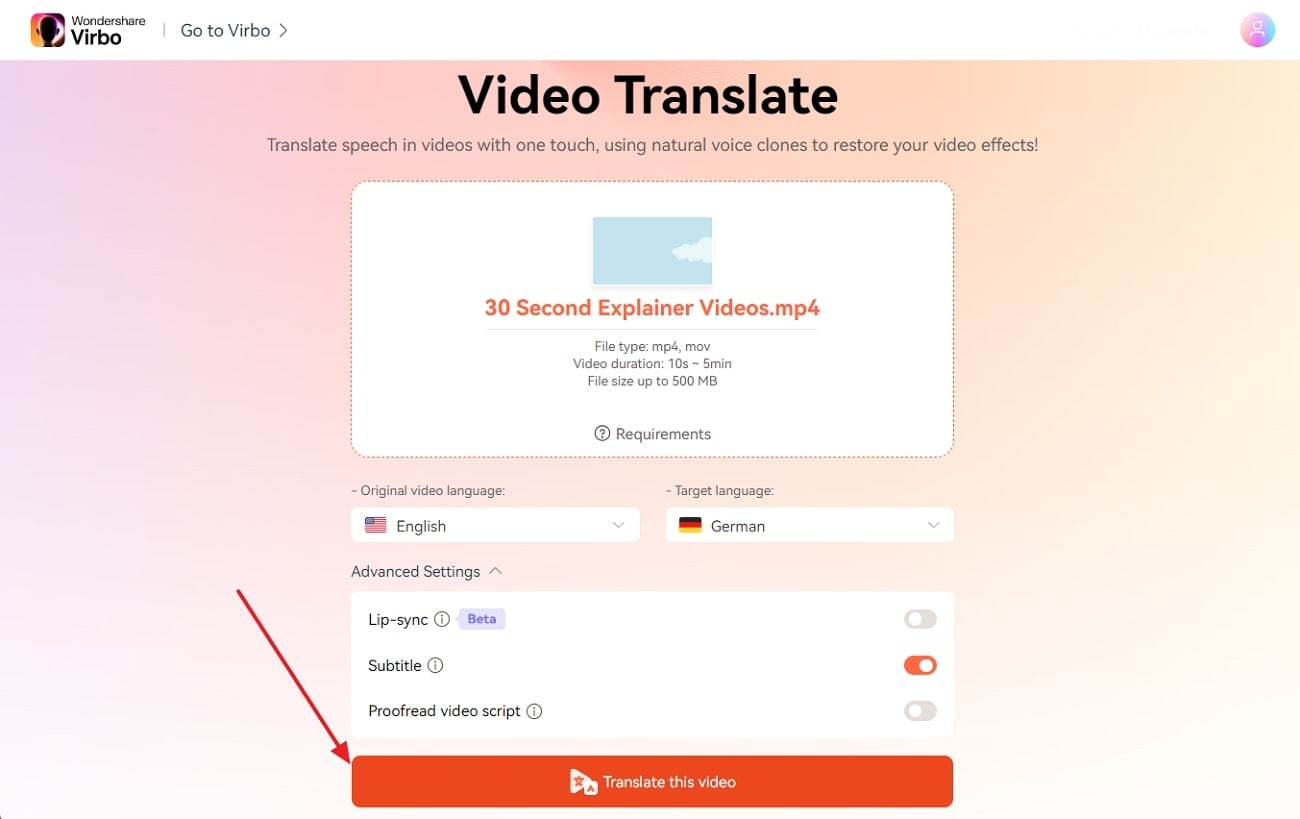
Step 3Generate your translated Video

Click on Generate Video to begin the video translation process. It will take some time so be patient.
When the translation finishes, preview it. If everything is fine, click on Download Video to save your video offline. Easy peasy!
Translate Video Online Translate Video on Win
Part 4. Frequently Asked Questions (FAQs)
01of 04Is Virbo Free?
Yes, Virbo software is free to download and use. It has a free plan that lets you translate 2-minute videos (500 MB max) without costing a dime. The premium plan gives you access to more features and allows longer videos.
02of 04What languages does Virbo support?
Virbo currently supports 20 languages and constantly working to add support for more languages. With Virbo, you can translate to and from these languages with ease. For a complete list, check out the Part 2 section above.
03of 04Does Virbo generate subtitles?
Yes, the Virbo online tool automatically generates subtitles. You can edit and customize them if necessary. It also gives you the option to download subtitles as SRT files once you are done. Note: This feature is only available for the Virbo online tool.
04of 04How accurate is English to Arabic or Arabic to English translation generated by Virbo?
The translation accuracy of Virbo is approximately 98.6%, thanks to the utilization of the latest AI technology. It utilizes advanced machine learning mechanisms to ensure contextually relevant translation. However, there’s still a minor chance of error. So, get some human eyes to review the generated text before finalizing.
Conclusion
Arabic to English and vice versa translation can be a bit tricky for common AI translation tools. However, with the right tool, such as Wondershare Virbo, you can translate YouTube video to Arabic online or offline. This way, content creators can seamlessly bridge any and every language barrier. Embracing these latest solutions enhances accessibility, fosters cross-cultural understanding, and makes video content more inclusive and impactful on a global scale.
Translate Video Online Translate Video on Win
Translate Video From Japanese to English Online for Free
Let’s say you’re a business owner or a content creator in Japan. If you want to broaden your horizons, you may need to translate videos from Japanese to English. This is because English is spoken globally. You can sell more, share knowledge, and connect with English speakers worldwide.
For streaming platforms, turning Japanese content into English is a ticket to reaching audiences all over the globe. And businesses using Japanese tech might need translated training videos for their remote workers.
Seeing this growing need, it’s clear you need effective video translation solutions. So, we’ve created a guide to help you choose the best method for each step, including using AI. Finding the right way to translate videos is important, so keep reading!
Part I. Completed Process To Translate Videos From Japanese to English
When you want to translate a video from Japanese to English, you can follow some general steps, no matter how you decide to do it. Let’s break down each step for you:
- Step 1: Video Transcription
Before you can translate, you need to understand what’s being said. So, the initial step is to do a video transcription. You can either hire professionals or use a Japanese-to-English video translator app to convert the spoken language to text.
Transcription captures all the Japanese dialogue, ensuring the English translation is spot-on. Having the text file lets you edit it, like shortening sentences or adjusting cultural references. This results in a smoother and more natural English video for you.
- Step 2: Translation
Once you have the transcript, you can translate the Japanese text into English. A good translation ensures the original message is accurately conveyed in the new language. It avoids any misunderstandings or misinterpretations for your English viewers. You have two options to do it. Both have strengths and weaknesses, so let’s see which suits your needs best.
- Professional Human Translation Services
When you want to translate a video from Japanese to English, a pro can make the sentences sound right for your audience. These professionals tweak the tone to be natural and engaging. If you go to translation agencies, they make sure the work is top-notch by going through strict editing and reviewing. However, human translation services cost more and take a bit more time than machine translation tools.
- Machine Translation Tools
Machine translation tools are fast and affordable. They can be a good option for short, simple videos where perfect accuracy isn’t critical. But it often struggles with complex language, cultural references, and humor.
- Step 3: Timing and Implementation
Let’s talk about making the Japanese to English video translation seamless. After translating, you want the words to match the original rhythm and pace of the speaker in the video. It keeps things feeling natural and engaging for you, the viewer. Plus, speakers use non-verbal cues like jokes, emotions, and pauses. Matching the translated text with these visual cues keeps the video’s meaning and impact intact.
How to do it? Professional workflows often use timecode, which gives each video frame a unique timestamp. It ensures super precise subtitle placement for that perfect synchronization. Some video editing tools even have “waveforms” to help visually line up subtitles with the spoken parts.
Here are several ways to add the translated Japanese text to your video:
- Subtitles
Subtitles are like on-screen translators for you. They show the English dialogue while the original Japanese audio goes on. It helps you understand if you get the visuals but not the language. The focus is on getting the main point across and sometimes making the sentences shorter for easier reading.
- Closed Captions
Like subtitles, closed captions (CC) are words shown on the screen. They go beyond spoken words, covering all the sounds you hear, like dialogue, music, and even background noises. The main goal is to help you, especially if you’re deaf or struggle with hearing. So, if you’re aiming for videos everyone can enjoy, try a video translator from Japanese to English with CC capabilities.
- Dubbing
Dubbing is a more intricate process where the original Japanese audio track is completely replaced. Voice actors step in to record the translated script in English. They try to sync up their words with the lip movements of the characters on screen. It makes it seem like the characters speak English right from the start, giving you a more immersive viewing experience.
- Voiceover
In this method, a narrator reads the translated script in English over the original Japanese audio. It’s often used in documentaries or educational videos when you need more info beyond just the dialogue.
- Step 4: Final Review and Approval
Alright, so you’re at the last step now. You’re giving the translated video a good check to ensure everything’s spot-on – accurate, consistent, and top-notch quality. It means looking out for any problems in the translation, timing, or how you choose to do it. Once you give the thumbs up to the final version, you’ve got a smooth and effective English video ready for your audience.
You might find the previous steps tedious and time-consuming. But what if you could translate your video from Japanese to English in minutes? That way, you could reach new markets and expand your influence faster. AI video translators like Wondershare Virbo can help you spread your work, passions, and stories to a global audience. Read on to learn more.
Part II. Virbo: Realistic AI Japanese to English Video Translator
You’re excited about your new product, but your explainer video feels like it’s only speaking to half the world. You know the potential exists, but the language barrier holds you back. Or perhaps you’ve captured stunning footage from your recent trip to Kyoto, but sharing it with your followers feels like a lost cause.
Here’s the deal: you don’t have to stick to a small crowd.
Get Started Online Free Download
Virbo uses the latest AI tech to automatically translate, dub voice, and add synced subtitles to your Japanese video. This app is simple to use and can translate video content into over 20 languages. Virbo translates Japanese to English videos in a few minutes – all free for videos under 2 minutes!
Here’s what makes Virbo stand out:
- Precise Lip-sync: Say goodbye to awkward, out-of-sync translations. Virbo AI video translator ensures the translated dialogue seamlessly matches the speaker’s lip movements and facial expressions, creating a natural and engaging experience (still in beta, but getting better every day!).
- AI Cloning Voices: Add engagement with Virbo’s AI-cloned voices that capture the essence of human speech. Choose from a range of natural-sounding voices that express the right emotions and add personality to your content.
- Soundtrack Reserved: Don’t lose the original soundtrack that sets the mood. Virbo allows you to keep it intact, enhancing its impact even in different languages.
- Versatile Compatibility: Virbo works across various platforms, including Windows, iOS, and Android. You can even use it online for ultimate flexibility.
- Affordable Excellence: Experience the power of AI video translation without breaking the bank. Virbo offers high-quality solutions at affordable prices, making them accessible to everyone.
Part III. How To Translate Japanese to English Video Using Virbo Automatically
Using Virbo AI video translator can help you be more productive. Here’s how to translate a video in Japanese to English online for free:
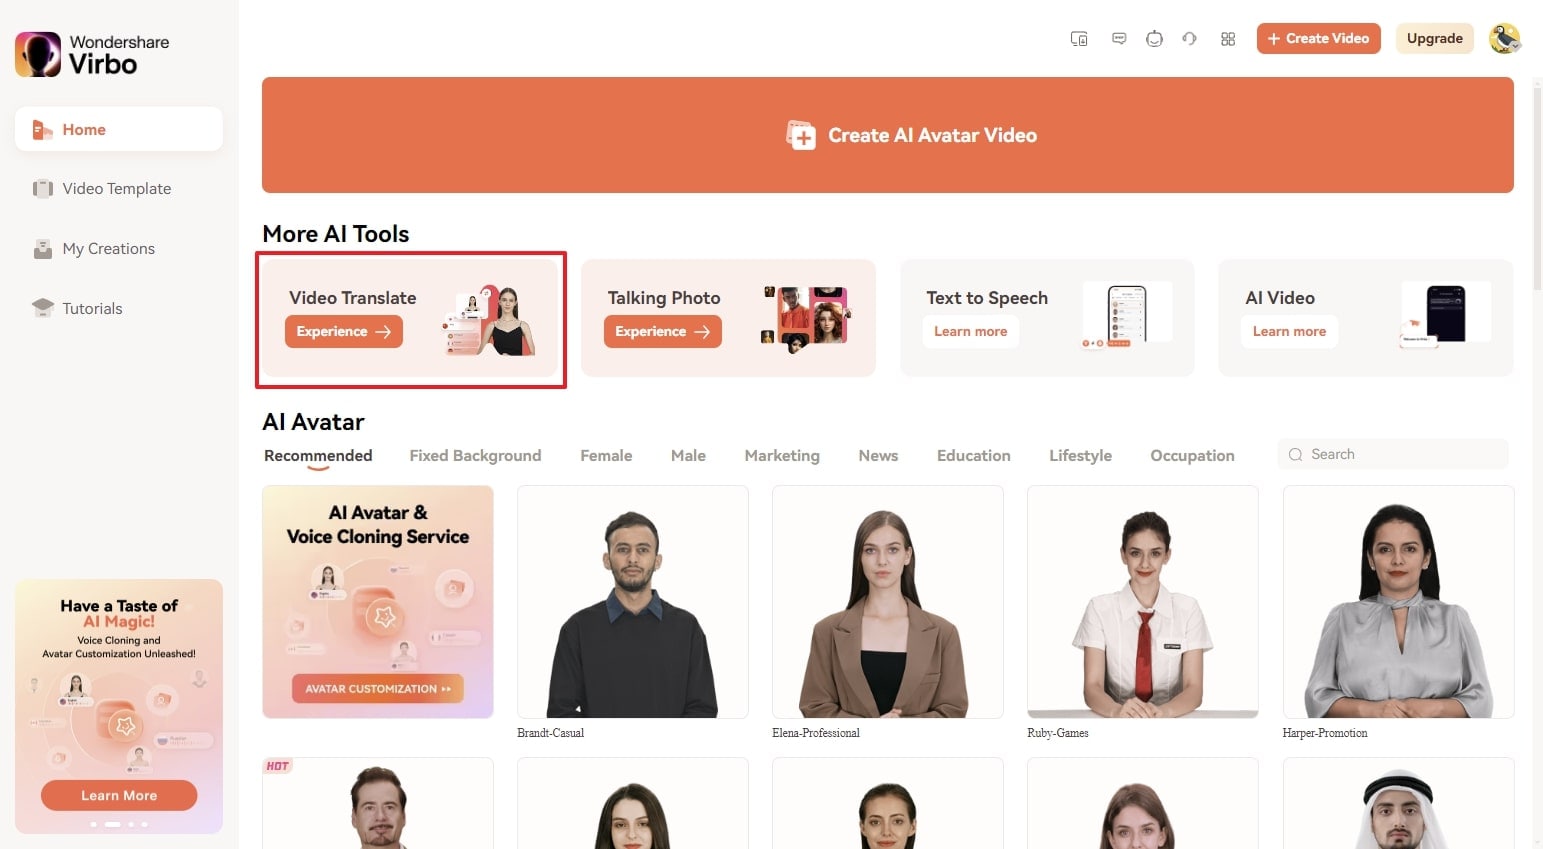
- Step 1: Go to Virbo AI video translator online from your browser for quick access. You can also download the app for your desktop. Once you’ve chosen your access point, sign in using your existing Google, Facebook, email, Apple, or Twitter account.
Get Started Online Free Download
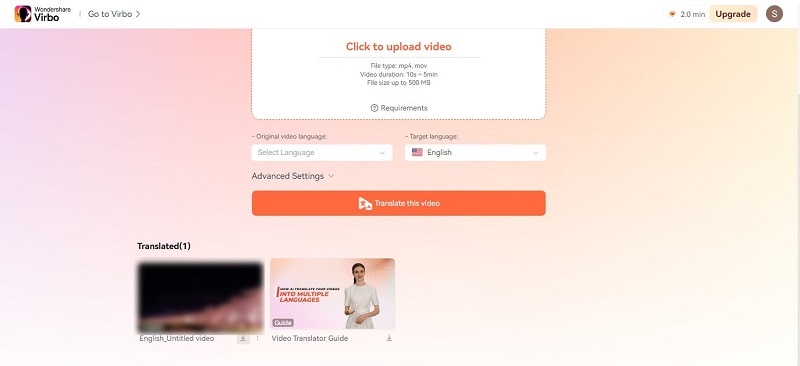
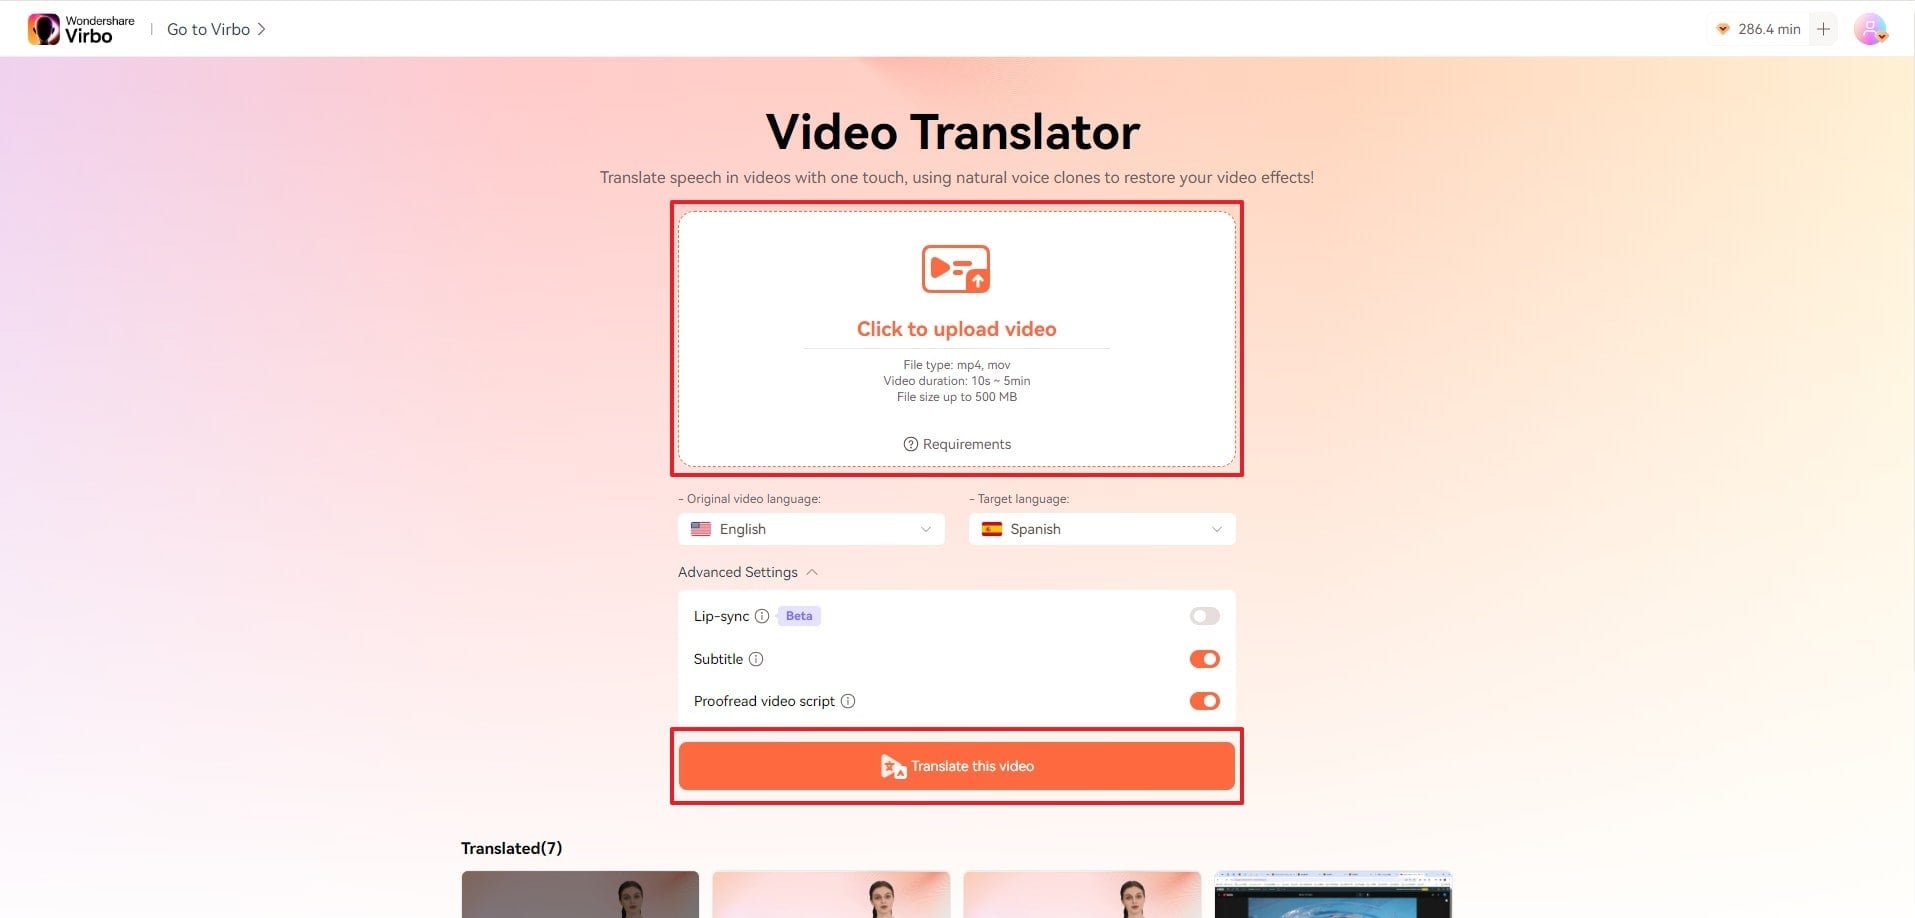
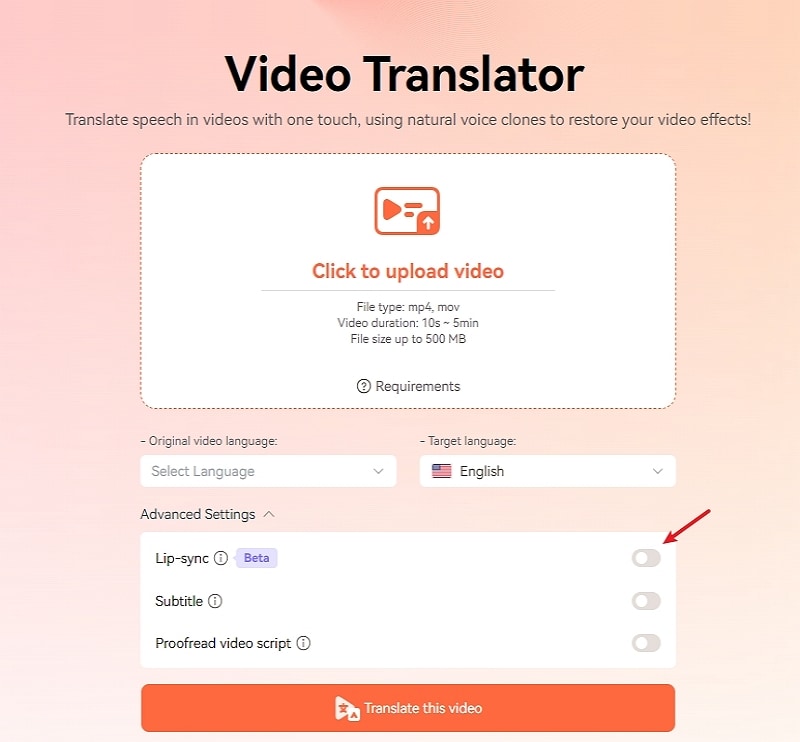
- Step 2: Choose and upload your Japanese video file from your local storage. Ensure the video is between 10 seconds to 5 minutes long and in MP4 or MOV format, up to 500 MB for optimal processing.
- Step 3: Specify Japanese as the Original video language and English as the desired Target language.
- Step 4: Virbo offers Advanced Settings to customize the translated view result. Toggle on the Lip-sync, Subtitle, and Proofread video script switches to enable them when needed.
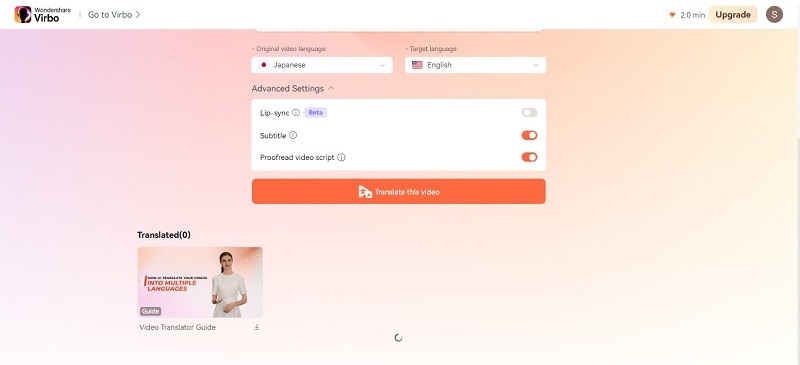
- Step 5: Click Translate this video to start the translation process once everything is set.
- Step 6: Wait a few moments while Virbo performs video transcription. Review the text and edit if needed.
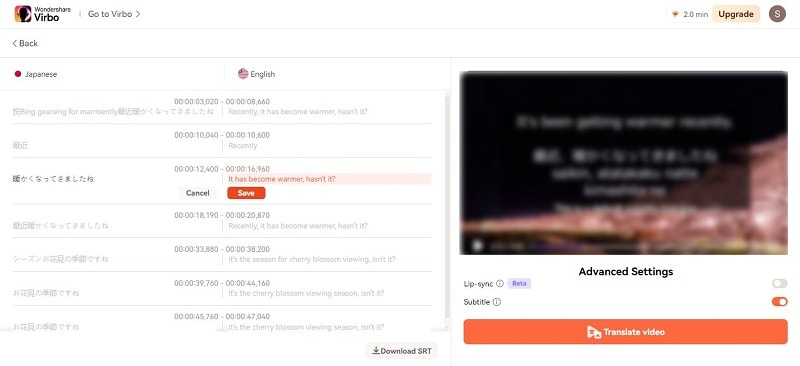
- Step 7: Click Translate video to proceed, then the video will go to the queue.
- Step 8: After completion, you can preview the translated video before downloading the final English version.
Part IV. How To Achieve the Best Video Translation Results?
You can’t always translate a video from Japanese to English without a few difficulties. Here are some ways to make the process easier for you:
Divide the Script Into Manageable Chunks
Break down the script into smaller sections like sentences, phrases, or even shorter segments depending on the video’s pace and complexity. It allows for more precise timing adjustments later.
Use a “Shadowing” Technique
As you watch the video, read the translated text out loud. Adjust the subtitle timing to match how you naturally speak. Doing this makes the flow feel more natural for you and the viewers.
Test and Refine
Now that you’ve set the timing for the subtitles, it’s time to put them to the test with your target audience. This step is important because it helps you catch any timing problems, awkward phrasing, or cultural differences that might have slipped through during editing.
Listen to what your audience says, and then use that feedback to tweak the subtitles. Your goal is to make sure they’re clear, short, and match the audience’s culture.
AI for Pre-Translation Tasks
Take advantage of AI tools for speech-to-text conversion and automatic subtitle generation. It can save time, but always proofread for accuracy and natural flow.
File Compatibility
Ensure your chosen translation service or tool supports the format of your video file. The common formats include MP4, MOV, and AVI.

Conclusion
So you’ve seen how easy it can be to translate a video from Japanese to English. It’s up to you whether you will ask for the help of human translators, video editors, or AI video translators.
As you know, Virbo goes beyond being a basic Japanese to English video translator and converter. It takes the complexity out of translation, offering seamless and accurate results.
But remember, even the best AI translation can benefit from a human touch. Don’t be afraid to experiment and refine your translated video for the best outcome. With a little effort, you can bridge the language barrier and share your Japanese video content with the world.
A Complete Guide To Translate Video With Google
We live in an age when technology is ever-evolving. Google, being a leader in technological innovation, has introduced several tools that make communication more seamless. Most of us are already familiar with one such tool, Google Translate. After all, it’s the go-to text translation option for many people. But can it be used for translating a video? We will answer this question in detail below. So, let’s dive into the world of Google Translate Video.
Part 1: Benefits of Using Google Translate for Video Translation
Below are some of the biggest benefits of using Google Translate for translating videos:
1. Google Translate Saves Money
Most tools need money to access premium features, but not Google. Google Translate is absolutely free of cost. You can use it for hour-long videos and this service won’t charge you a dime. This can help you save some bucks on hiring professional translation services.
2. Google Translate Supports Almost All Languages
That’s correct. Google Translate currently supports 133 languages of the world. That means with the help of Google Translate you can reach a much wider global language than any other service. You can easily translate your tutorials, how-to guides, podcasts, social media posts, scripts etc to reach as many people as possible.
3. Google Translate Works In Real Time
Google Translate provides instant translations. You don’t have to wait for the AI to understand the language first and then provide accurate translations. So, Google Translate video can be a lifesaver for content creators who are always on the go and need instant access to translations for their content.
4. Google Translate Needs No Installation or Sign Up
Most translation tools require either a sign up or software installation, Google Translation is straightforward to use. Simply copy your content and paste it into the translation window. Google Translate will instantly pick up the language to give you the translation. It’s that simple.
5. Google Translate Also Works Offline
The biggest benefit of Google Translate is uninterrupted service. You can download Google Translate app on your mobile phones and translate content offline. It can be particularly beneficial for content creators who don’t always have an internet connection.
Part 2: Step Guidance: How To Get Google Translate to Translate A Video
If you are a beginner the following steps may seem a bit of work, but let me assure you, they are very straightforward. Follow along to Google translate videos:
Translate Video Online Download APP Now Free Download
Step1Upload Your Video To Virbo
Virbo is an AI Video Editor. Among other features, it has a fantastic online video translator that you can use to translate videos into 20+ languages.
So, go to Virbo, and then click on Video Translator Tool in the top right corner. Upload your video.
Step2Select Source & Target Language To Translate Your Video
When video is done uploading, you will see the option to select Source and Target languages. Select your video language as the Source, and the language you want it translated into as the Target.
You can download subtitles as SRT or TXT files.
Step3 Use Google Translate to Further Improve Translation

Finally, copy and paste the subtitles on Google Translate and get your desired translation.
That’s all. That’s how you successfully Googel Transalte a video!
Translate Video Online Download APP Now Free Download
Part 3: Best Alternatives To Google Translate
Below are some alternatives you can use if Google Translate is unavailable. These options are just as good, if not better.
1. Virbo
Translate Video Online Download APP Now Free Download
We previously mentioned Virbo for burning subtitles on your Video. But you can also use it to translate a video, edit subtitles, create instant dubs/voiceovers, make AI avatar videos and do so much more. It is a great option if you want a host of features to streamline your content creation process besides mere subtitle translation. Virbo is available on all major platforms, such as Online Browsers, PC/Laptop, Android, and iOS devices.
2. Microsoft Translator

Microsoft Translator is another great option for video translation. It allows real time translated conversations across multiple devices and platforms. Another difference between Google and Microsoft Translator is that Microsoft’s Translator supports fewer languages. It’s only available for 103 languages, which is still more than big name translation services. A unique feature of Microsoft Translator is that it is also compatible with the MS Office suite. So you can use it with MS Excel, One Note, PowerPoint and Outlook. Lastly, this tool is particularly helpful with contextual understanding of a sentence.
3. SubtitleBee

SubtitleBee is also a great service to quickly translate and add subtitles to online videos. With a reported accuracy rate of 95%, this service is among some of the most accurate in the market. Moreover, it allows you to customize subtitles, edit and add cool font styles, colors, background details and orientation to create your unique projects. Another great feature is that with SubtitleBee you can add subtitles anywhere on screen. Even on top, if you so want. It also has a supertitles feature as a bonus, which enables you to add head titles on videos.
Part 4: FAQs about Google Translate Video Audio
1. Can I translate a full video with Google Translate?
Of course, you can use Google Translate to get the translation of any length video. You will first have to transcribe the entire audio and then translate that transcript with the help of Google Video. You can use services like Virbo to add these translated subtitles to the original video.
2. Does Google Translate really work for video translation?
Well, Google Translate does not directly translate a video. You have to integrate it with other services like YouTube to get translation and then use Google Translate as a secondary tool to translate a video.
3. Can I get a translated video in my native language?
Yes, Google Translate supports almost 133 languages of the world. If your native language is spoken by a large population, chances are Google supports its translation to and from other languages. So, you can get a translated video in your native language.
4. What languages does Google Translate support?
Google Translate supports approximately 133 languages of the world at the moment. But it keeps on adding new language support every once in a while. You can get translations in all popular languages like English, Chinese, Spanish, French, Japanese, Hindi, Italian, Russian, Korean, etc.
Conclusion
That’s pretty much all about translating a video using Google Translate. Tools like Google Translate and Wondershare Virbo make our world more connected than ever. They bridge boundaries and bring people together. But, don’t forget, if you are translating any copyrighted content with Google Translate, you may need permission. Translating copyrighted content without permission is still copyright infringement. Use these tools with responsibility. Now, go on, Google Translate video online. Good luck!
Translate Video Online Download APP Now Free Download
Step1Upload Your Video To Virbo
Virbo is an AI Video Editor. Among other features, it has a fantastic online video translator that you can use to translate videos into 20+ languages.
So, go to Virbo, and then click on Video Translator Tool in the top right corner. Upload your video.
Step2Select Source & Target Language To Translate Your Video
When video is done uploading, you will see the option to select Source and Target languages. Select your video language as the Source, and the language you want it translated into as the Target.
You can download subtitles as SRT or TXT files.
Step3 Use Google Translate to Further Improve Translation
Finally, copy and paste the subtitles on Google Translate and get your desired translation.
That’s all. That’s how you successfully Googel Transalte a video!
Translate Video Online Download APP Now Free Download
Part 3: Best Alternatives To Google Translate
Below are some alternatives you can use if Google Translate is unavailable. These options are just as good, if not better.
1. Virbo
Translate Video Online Download APP Now Free Download
We previously mentioned Virbo for burning subtitles on your Video. But you can also use it to translate a video, edit subtitles, create instant dubs/voiceovers, make AI avatar videos and do so much more. It is a great option if you want a host of features to streamline your content creation process besides mere subtitle translation. Virbo is available on all major platforms, such as Online Browsers, PC/Laptop, Android, and iOS devices.
2. Microsoft Translator
Microsoft Translator is another great option for video translation. It allows real time translated conversations across multiple devices and platforms. Another difference between Google and Microsoft Translator is that Microsoft’s Translator supports fewer languages. It’s only available for 103 languages, which is still more than big name translation services. A unique feature of Microsoft Translator is that it is also compatible with the MS Office suite. So you can use it with MS Excel, One Note, PowerPoint and Outlook. Lastly, this tool is particularly helpful with contextual understanding of a sentence.
3. SubtitleBee
SubtitleBee is also a great service to quickly translate and add subtitles to online videos. With a reported accuracy rate of 95%, this service is among some of the most accurate in the market. Moreover, it allows you to customize subtitles, edit and add cool font styles, colors, background details and orientation to create your unique projects. Another great feature is that with SubtitleBee you can add subtitles anywhere on screen. Even on top, if you so want. It also has a supertitles feature as a bonus, which enables you to add head titles on videos.
Part 4: FAQs about Google Translate Video Audio
1. Can I translate a full video with Google Translate?
Of course, you can use Google Translate to get the translation of any length video. You will first have to transcribe the entire audio and then translate that transcript with the help of Google Video. You can use services like Virbo to add these translated subtitles to the original video.
2. Does Google Translate really work for video translation?
Well, Google Translate does not directly translate a video. You have to integrate it with other services like YouTube to get translation and then use Google Translate as a secondary tool to translate a video.
3. Can I get a translated video in my native language?
Yes, Google Translate supports almost 133 languages of the world. If your native language is spoken by a large population, chances are Google supports its translation to and from other languages. So, you can get a translated video in your native language.
4. What languages does Google Translate support?
Google Translate supports approximately 133 languages of the world at the moment. But it keeps on adding new language support every once in a while. You can get translations in all popular languages like English, Chinese, Spanish, French, Japanese, Hindi, Italian, Russian, Korean, etc.
Conclusion
That’s pretty much all about translating a video using Google Translate. Tools like Google Translate and Wondershare Virbo make our world more connected than ever. They bridge boundaries and bring people together. But, don’t forget, if you are translating any copyrighted content with Google Translate, you may need permission. Translating copyrighted content without permission is still copyright infringement. Use these tools with responsibility. Now, go on, Google Translate video online. Good luck!
Translate Video Online Download APP Now Free Download
Top 5 Udemy Subtitle Translation Tools for Seamless Auto Translations
One of the most common problems Udemy users encounter is that a course is not in their native language. However, even though Udemy provides captions, many courses might not provide subtitles in your language.
That’s why you need a Udemy subtitle translator that will allow you to watch a course or video in your native language with subtitles that you can actually understand. So, let’s discover the top five best Udemy subtitle translators and how they work.
Part 1. Can YouTranslate the Udemy Subtitle?
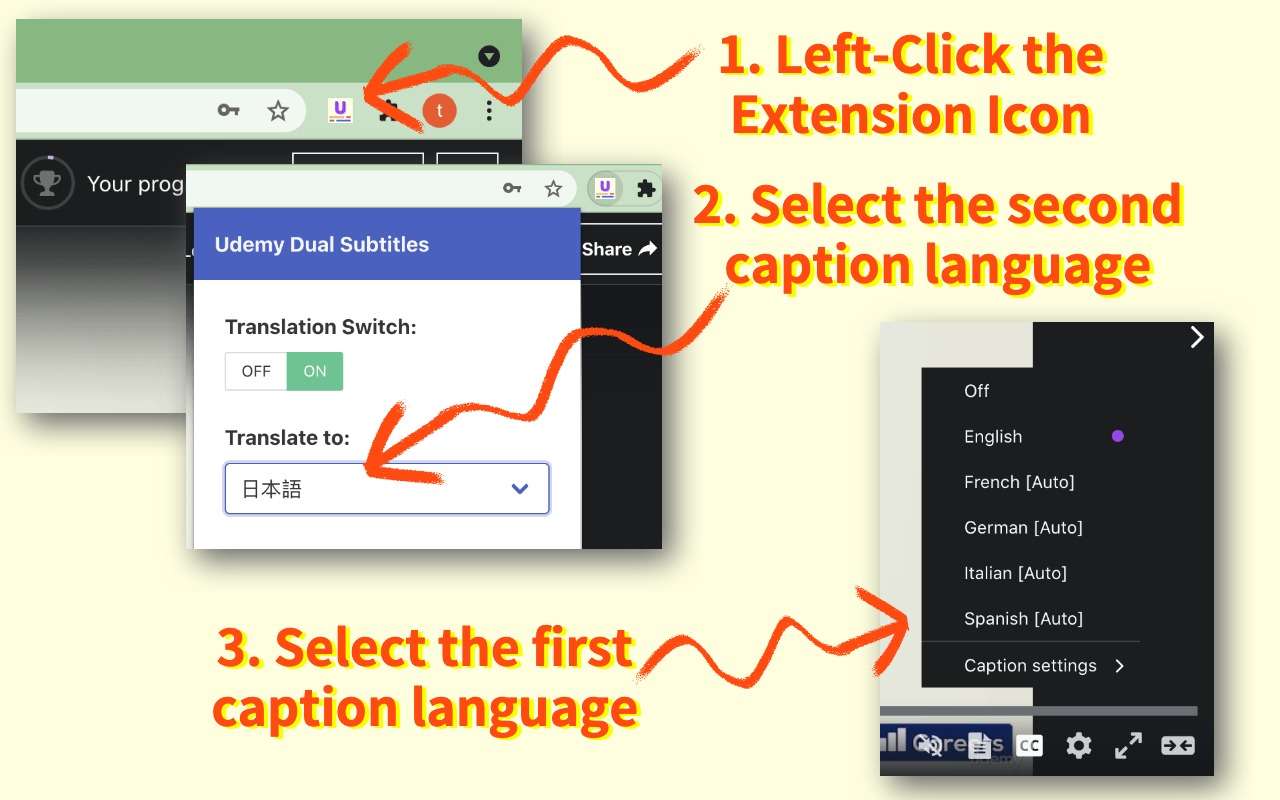
Translating subtitles on Udemy might not be directly possible, but there are workarounds. As long as you are using Google Chrome and watching courses on the website, you can use Udemy dual subtitle apps from the Chrome app store and incorporate them in your browser to get auto-translation of whatever video you are watching.
Many dual subtitle tools are available on the market, but in this blog, we are covering the top five to translate Udemy subtitles. Let’s say that you have bought a course on Web Development.
With the right use of AI, Machine Learning, and advanced algorithms, these tools set you up for success so you can learn any course of your liking, regardless of which language it is in. So, let’s uncover these tools and their key features.
Part 2. 5 Best Udemy Subtitle Translators
1. Udemy Dual Subtitles - Subtitles Translator
When it comes to Udemy translating subtitles, there are a lot of things you might have a problem with. First, you might not even have the language you are looking for. Secondly, the format isn’t the most pleasing. And lastly, you cannot display bilingual subtitles to take your learning to the next level.
That’s where Udemy Dual Subtitles comes in. It is a Chrome extension that will work on Google Chrome and Microsoft Edge. Its main prowess is displaying bilingual subtitles so you can learn in the most optimal way possible.
Moreover, Udemy Dual Subtitles expands Udemy’s original subtitles to show duals so you can easily understand what’s going on the screen. It can translate Udemy’s official subtitles into all widely used languages; switching them is a piece of cake.
Here are some of the features it offers:
Key Features
- Versatile Translation: Translate Udemy subtitles in most languages that are commonly used around the globe
- Easy-To-Use: No need to set up every time. Just install the plugin to Chrome and get started right away
- Custom Styling: Udemy subtitle translator with custom styling abilities
- Bilingual Languages: Supports and displays dual subtitles to make learning easier and more effective
- Downloading Subtitles: You can download subtitles by using the Udemy Dual Subtitles tool
Pros
- Makes understanding courses easier
- Supports a plethora of languages
- Allows custom styling for better viewing
- Very good customer support
Cons
- Can cause occasional glitches
2. Udemy Subtitles Translator - Yakuu

Yakuu is another popular Udemy subtitle translator that enables learning from anywhere in the world. It virtually features all the languages and does real-time translation in a way that feels natural and easier to look at.
Moreover, just like other subtitle translating tools, it enables Udemy’s subtitles to be translated and to be shown in dual-subtitle mode, meaning learning will be easier than ever. It also supports all display modes including full screen and paging, without breaking down or messing up the subtitles.
All the features specified in Yakuu cater to the needs of users who are looking for a translation of subtitles. Moreover, it easily lets you translate the subtitles with three simple steps and doesn’t even require a bit of setup like many other services.
Key Features
- Responsive Subtitles: Allows responsible subtitles to be displayed in full or auto-paging mode
- Bilingual Subtitle Support: You can seamlessly switch between single and dual language subtitles at the same time
- Three-Step-Process: Download the tool, install it on Chrome, and simply pin to the toolbar to leverage the benefits
Pros
- Automatically display translated subtitles in the local language
- No need for a hierarchical menu selection
- Learn anywhere in any language for free
Cons
- It doesn’t support custom styling of subtitles
3. Udemy Subtitles Translator with Custom Style

When it comes to subtitles, some people like custom styling to make them easier to read. While you can adjust Udemy’s default subtitles, they are quite limited. With the Udemy Subtitles Translator tool, you have the ability to leverage Google Translate, which will show real-time updates.
All you need to do is install the subtitle, open the Udemy course, click Transcript, and click the Google Translate plugin that will translate everything to you in real time so you can enjoy your favorite course in your language.
Being a tool that is run by Google Translate, you have a lot of accuracy. Google Translate supports most languages available in the world with precision that we have never seen before. So, if you want one of the best Udemy subtitle translators, then this tool will give you the feature to enjoy your favorite course while understanding it a bit better.
Key Features
- Google Translate Support: Has Google Translate in the background to do the translation
- Custom Subtitles: You can stylize the subtitles according to your need
- Fast and Lightweight: Provides enhanced accessibility to Udemy users
Pros
- Great tool for non-English speaker people
- Quite accurate and on-point
- Allows customization of subtitles so you can customize colors, positioning, and the next
Cons
- Sometimes it doesn’t work properly
4. Udemy Double Subtitle

Double subtitles are quite popular when it comes to learning something new. Thankfully, Udemy Double Subtitle is one of the best tools to provide you with dual subtitles and translations that would make learning easier for you.
Let’s say that you already know some English but you are a Korean native. By using Udemy Double Subtitle, you can add both English and Korean to make everything even easier for you.
One thing to note is that whenever you enable a subtitle, you might need to reload the webpage for the tool to work. Overall, it is a great tool for you if you are looking to translate subtitles and learn in a way that’s more immersive.
Here are some of the features of the Udemy Double Subtitle tool.
Key Features
- Dual Subtitles: Supports dual subtitles to be displayed at once
- Fast and Efficient: The tool is lightweight and can display accurate results
- Privacy Protection: The developer doesn’t take your data, which means it is protected
Pros
- Great for learning and enhancing accessibility
- Works fastly and efficiently
- Enabling the tool takes less time
Cons
- Less languages available
5. SubTrans
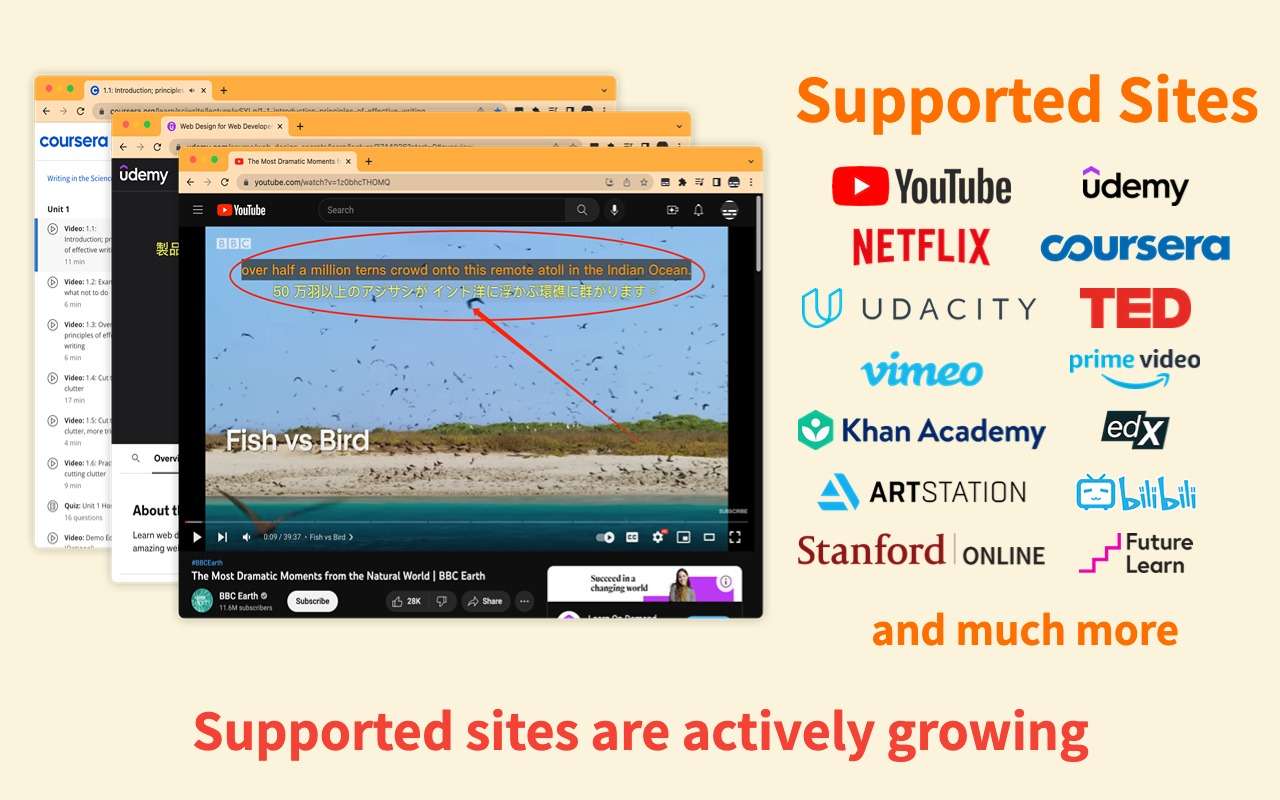
SubTrans is a general subtitle translator for a plethora of sites. Aside from Udemy, it can work on YouTube, Netflix, Coursera, TED, Khan Academy, and many more. The list of sites they support is ever-growing, and the developers are actively working to enhance the functionality of their tools.
SubTrans displays bilingual subtitles and can be used for as many video sites as possible. It can translate subtitles into almost all languages and also allows customization that is at the next level. From font size, colors, weight, and opacity to background, you can change anything in SubTrans.
Moreover, one of the best features of SubTrans is its ability to delay the subtitles. Hence, even if you feel like the subtitles don’t match, you can manually adjust them.
Key Features
- External Subtitles Support: You can also import external subtitles to be displayed on the videos
- Timestamp Control: In case the subtitles don’t go well, you can advance or delay them
- Styling Options: You can stylize almost every aspect of the subtitles
Pros
- No need to set every time
- Supports external subtitles
- Adjustable timestamp
- Display bilingual languages
Cons
- Only 30 minutes is free per month
Part 3. Translate Videos in Another Language using Virbo
Do you want to translate the entire video into another language besides subtitles? If so, Wondershare Virbo can help you as it’s an AI-powered video translator. It can be used as an Udemy subtitle translator and provides perfect video translations. It’s a cross-compatible platform that is available to use on online browsers and desktop applications. You can upload videos of up to 500MB within 10 seconds to 5-minute duration for smooth video translation.
Prominent Features of Virbo - Video Translation
- Diverse Languages: This software supports more than 20 diverse languages for video translation. This means you can learn any language course.
- Subtitles: Apart from translating videos, Virbo has an Udemy translate subtitles While translating videos, you can effortlessly enable this feature to get subtitles in videos. Notably, it is preferred to upload videos without subtitles to ensure the quality of the output video.
Translate Video Online Download APP Now Free Download
3.1 Why Choose Wondershare Virbo
Several platforms are available for video translation, some of which are discussed above. Now, let us help you make your selection by highlighting some of the benefits of Virbo. Delve into this part and learn why choosing Virbo will significantly assist you in learning courses.
- Breaking Language Barrier: International students with language difficulties in learning can get relief from Virbo. You can download your course content and translate it into your native language.
- Language Learning: Subtitles in the videos that Virbo provides can help you learn a new language. It enables you to understand the pronunciation of words and take notes while watching.
- Research Students: Virbo may help research students accurately quote or rephrase key points of the video. By translating, you understand the speakers’ intended meaning to cite in your research.
- Cross-Platform Support: Virbo is available for Windows, Web, and Mobile.
3.2 How to Translate the Udemy Subtitles Using Virbo?
To learn the Udemy course in a non-native language, follow these simplified instructions to translate the subtitles with the highest accuracy:
Step 1: Upload Your Udemy Course Video
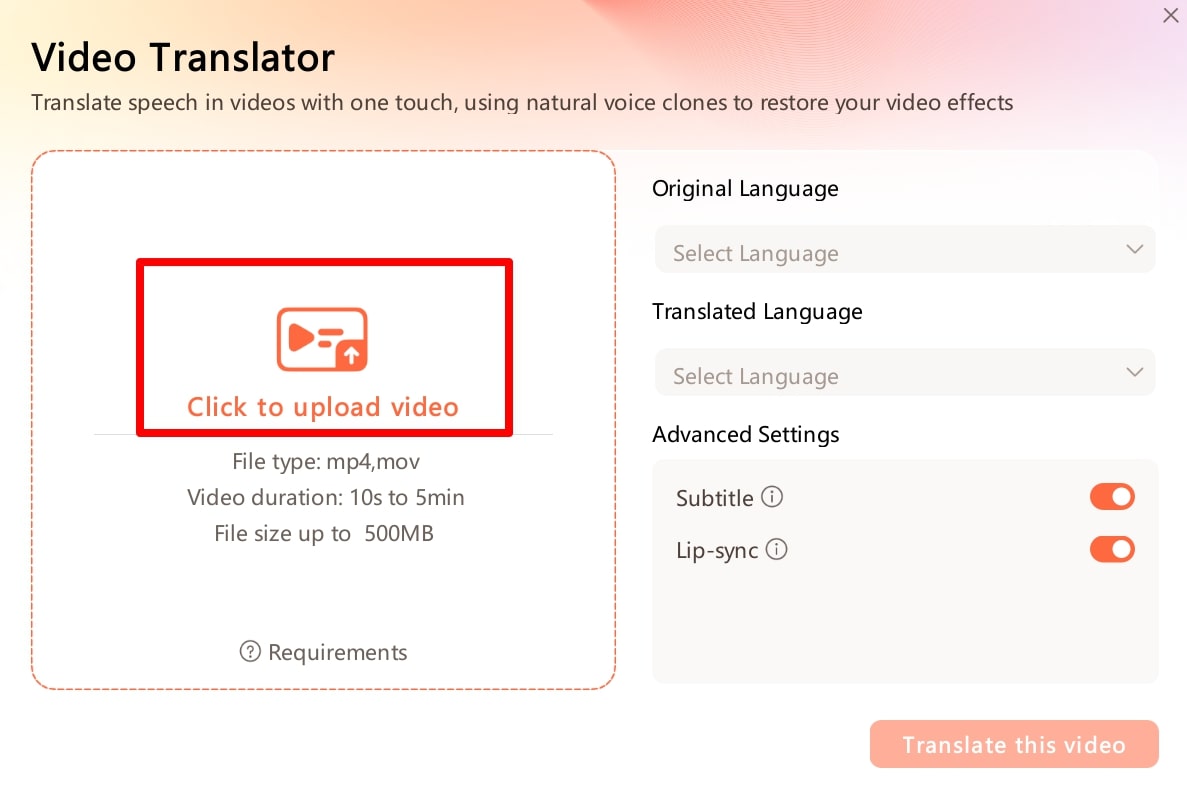
Open the online version of Wondershare Virbo - Video Translator on your web browser. Hit the “Click to Upload Video” option and upload your Udemy video in Virbo.
Translate Video Online Download APP Now Free Download
Step 2: Customize the Translation Settings
Move down and choose “Original Video Language” and “Target Language” using their lists. Then, tap the downward icon of “Advanced Settings” and get multiple options later. From there, toggle the “Subtitles” option to generate translated subtitles in the video.
Step 3: Initiate the Udemy Video Subtitles Translation
Upon setting the video translation parameters, press the “Translate the Video” button and let AI analyze. Finally, you will get your Udemy course video with translated subtitles in your target language.
Translate Video Online Download APP Now Free Download
Bonus Tip: What Virbo Can Do If You Want to Create a Udemy Course You Own?
- AI Script Generator: If you lack some course creation ideas, Virbo has an AI script generator. It can help you brainstorm ideas about Udemy courses by providing compelling scripts within seconds. All you need to do is provide text instructions and set certain parameters for exact results.
- AI Avatar: Virbo eliminates the need for human presenters, cameras, and equipment to create a course. It has AI avatars from diverse ethnicities, genders, regions, attire, and ages. These life-like avatars can create educational videos with the script you provided and AI voices.
- AI Voice: This feature of Virbo works as a text-to-speech converter that has expressive AI-generated voices. It can narrate your Udemy course with captivating voiceovers in different accents and tones. Hence, enjoy high-quality audio in various languages from this Udemy subtitle translator.
Create Video Online Download APP Now Free Download
Part 4. FAQs about Udemy Subtitle Translator
1. How do I add subtitles to the Udemy course?
You can create subtitles from scratch using a simple text editor like Notepad or TextEdit. You need to follow the .vtt format for subtitles, which involves specifying the timing and text of each subtitle line. This option requires more effort but gives you complete control over the accuracy and style of your subtitles. You can also use Wondershare Virbo, which can generate subtitles automatically when you use this tool to translate videos.
2. How to add auto translate on any video
Auto translation can be achieved by using various tools. One of the best tools for auto-translation is Wondershare’s Virbo. It allows you to add translated captions in various languages to any video of your choice. Upload your video, choose the translation option and then select “Translate” and choose the desired language. You can also edit the generated subtitles before exporting them.
3. Is there any AI tool for translation?
There are many AI tools for translation. Tools like Google Translate, DeepL, Virbo, and Veed IO help you translate videos, audio, or text to generate new media. The accuracy of these tools is high, which can help companies generate AI videos to further target the international market.
4. How to generate AI videos for educational content?
The first step is scripting, where you need to get the script ready for your educational video. Secondly, you need an AI-powered tool for generating the voice-over. You can use Virbo which will not only generate voice but video as well. Lastly, once you add the script, the software will create a video for you that you can test and then roll out in the digital world.
Final Verdict
Udemy is one of the largest e-learning platforms with hundreds of thousands of high-quality courses catering to audiences from all over the world. However, most courses will be in English since it is predominantly an English service.
But use Udemy subtitle translation tools like the ones we have mentioned above. You can easily and effectively learn courses in your own language by translating the subtitles into your native tongue.
Translate Video Online Download APP Now Free Download
3.1 Why Choose Wondershare Virbo
Several platforms are available for video translation, some of which are discussed above. Now, let us help you make your selection by highlighting some of the benefits of Virbo. Delve into this part and learn why choosing Virbo will significantly assist you in learning courses.
- Breaking Language Barrier: International students with language difficulties in learning can get relief from Virbo. You can download your course content and translate it into your native language.
- Language Learning: Subtitles in the videos that Virbo provides can help you learn a new language. It enables you to understand the pronunciation of words and take notes while watching.
- Research Students: Virbo may help research students accurately quote or rephrase key points of the video. By translating, you understand the speakers’ intended meaning to cite in your research.
- Cross-Platform Support: Virbo is available for Windows, Web, and Mobile.
3.2 How to Translate the Udemy Subtitles Using Virbo?
To learn the Udemy course in a non-native language, follow these simplified instructions to translate the subtitles with the highest accuracy:
Step 1: Upload Your Udemy Course Video
Open the online version of Wondershare Virbo - Video Translator on your web browser. Hit the “Click to Upload Video” option and upload your Udemy video in Virbo.
Translate Video Online Download APP Now Free Download
Step 2: Customize the Translation Settings
Move down and choose “Original Video Language” and “Target Language” using their lists. Then, tap the downward icon of “Advanced Settings” and get multiple options later. From there, toggle the “Subtitles” option to generate translated subtitles in the video.
Step 3: Initiate the Udemy Video Subtitles Translation
Upon setting the video translation parameters, press the “Translate the Video” button and let AI analyze. Finally, you will get your Udemy course video with translated subtitles in your target language.
Translate Video Online Download APP Now Free Download
Bonus Tip: What Virbo Can Do If You Want to Create a Udemy Course You Own?
- AI Script Generator: If you lack some course creation ideas, Virbo has an AI script generator. It can help you brainstorm ideas about Udemy courses by providing compelling scripts within seconds. All you need to do is provide text instructions and set certain parameters for exact results.
- AI Avatar: Virbo eliminates the need for human presenters, cameras, and equipment to create a course. It has AI avatars from diverse ethnicities, genders, regions, attire, and ages. These life-like avatars can create educational videos with the script you provided and AI voices.
- AI Voice: This feature of Virbo works as a text-to-speech converter that has expressive AI-generated voices. It can narrate your Udemy course with captivating voiceovers in different accents and tones. Hence, enjoy high-quality audio in various languages from this Udemy subtitle translator.
Create Video Online Download APP Now Free Download
Part 4. FAQs about Udemy Subtitle Translator
1. How do I add subtitles to the Udemy course?
You can create subtitles from scratch using a simple text editor like Notepad or TextEdit. You need to follow the .vtt format for subtitles, which involves specifying the timing and text of each subtitle line. This option requires more effort but gives you complete control over the accuracy and style of your subtitles. You can also use Wondershare Virbo, which can generate subtitles automatically when you use this tool to translate videos.
2. How to add auto translate on any video
Auto translation can be achieved by using various tools. One of the best tools for auto-translation is Wondershare’s Virbo. It allows you to add translated captions in various languages to any video of your choice. Upload your video, choose the translation option and then select “Translate” and choose the desired language. You can also edit the generated subtitles before exporting them.
3. Is there any AI tool for translation?
There are many AI tools for translation. Tools like Google Translate, DeepL, Virbo, and Veed IO help you translate videos, audio, or text to generate new media. The accuracy of these tools is high, which can help companies generate AI videos to further target the international market.
4. How to generate AI videos for educational content?
The first step is scripting, where you need to get the script ready for your educational video. Secondly, you need an AI-powered tool for generating the voice-over. You can use Virbo which will not only generate voice but video as well. Lastly, once you add the script, the software will create a video for you that you can test and then roll out in the digital world.
Final Verdict
Udemy is one of the largest e-learning platforms with hundreds of thousands of high-quality courses catering to audiences from all over the world. However, most courses will be in English since it is predominantly an English service.
But use Udemy subtitle translation tools like the ones we have mentioned above. You can easily and effectively learn courses in your own language by translating the subtitles into your native tongue.
Translate Video Online Download APP Now Free Download
Create Lip Sync TikTok Videos Without Installing Any App
TikTok has transformed the social media landscape through its short-form video content. They encourage users to make creative content using popular audio clips. Which enables them to entertain, gain recognition, and contribute to the platform.
Lip-syncing is a big part of what makes TikTok popular. Many users post lip-syncing videos that imitate voices from songs, movies, or trending audio clips. This art of lip-syncing has become an essential element of TikTok’s culture. Now, you might wonder **how to lip-sync on TikTok videos. This article will teach us how to make it effortlessly.
Part 1. Why Do People Lip Sync on TikTok?
Lip-syncing involves mimicking the words or vocals of an existing audio track. TikTok users take this concept to new heights by lip-syncing popular songs or clips. Lip-sync is appealing because it lets people get creative and reach a large audience.
Here are a few reasons why people engage in **lip sync TikTok:
- Self-expression: Lip-sync allows users to embody their favorite artists or characters by showcasing their personality and creativity.
- Entertainment: Many users lip-sync to entertain followers. They offer comedic performances, heartfelt renditions, or engaging storytelling.
- Virality: TikTok’s algorithm favors engaging content and well-executed lip-sync videos. They have the potential to go viral, rapidly gaining likes, shares, and followers.
Part 2. How to Make Lip Sync Video on TikTok
Here’s the step-by-step guide on how to lip sync on TikTok and captive your followers:
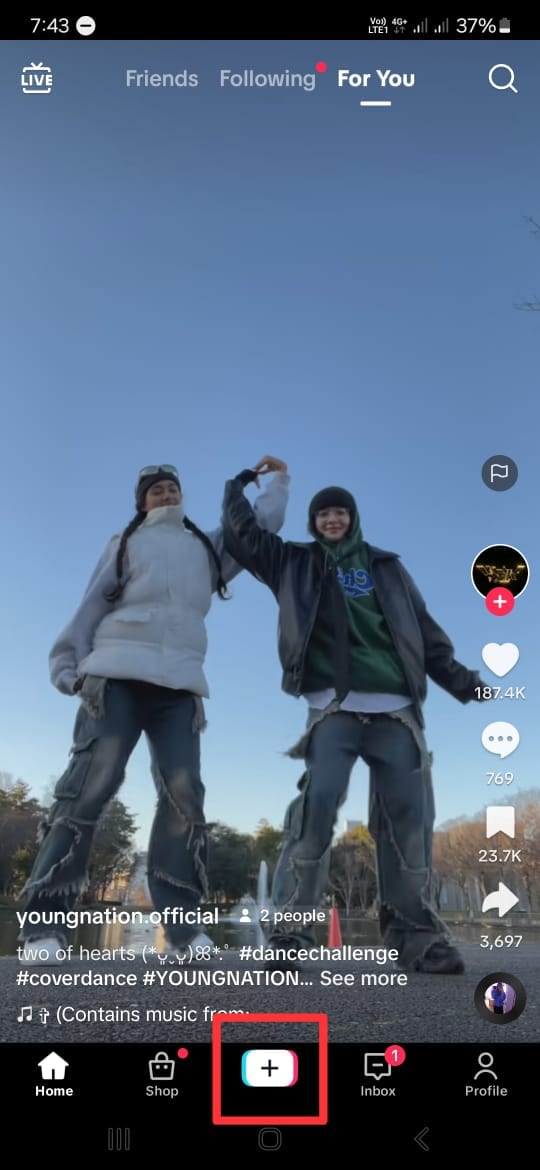
- Step 1. Open the TikTok app and tap the “+” button.
Start with opening the TikTok app on your phone. Then, tap the “+” button at the bottom of your screen to make a new video.
- Step 2. Add a song that you want to lip-sync to.
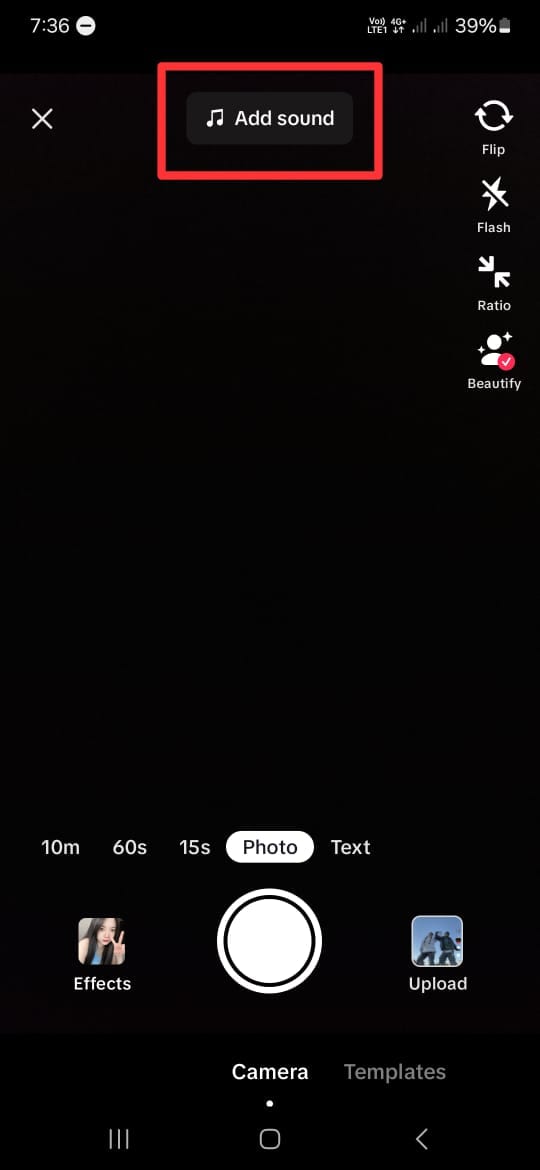
Next, click “Add Sound” with the musical note icon at the top of the screen. If you have a specific song in mind, you can find it by searching it on the search tab. Then, tap the song and click the check icon beside it.
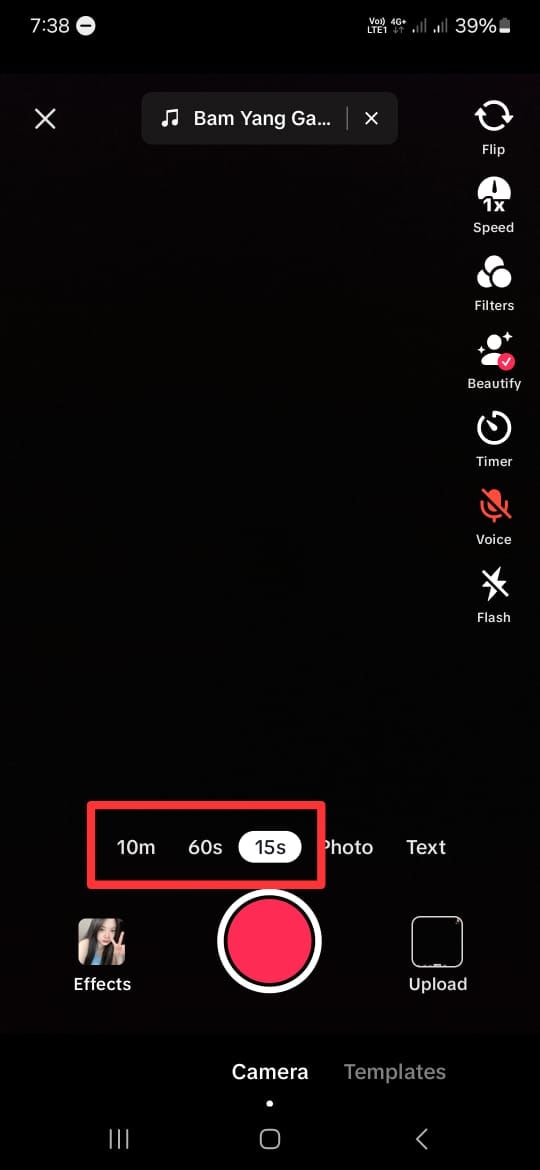
- Step 3. Choose the duration and the part of the song.
After choosing the song you want, you will return to the recording screen. Here, select your video duration at the bottom of the screen. You can choose between 10 minutes, 60 seconds, and 15 seconds. Remember that the duration of the songs on TikTok is usually only 30 to 60 seconds.
- Step 4. Choose the part of the song.
TikTok allows you to change the part of the song when lip-sync. However, the duration of the video should be less than the duration of the chosen song.
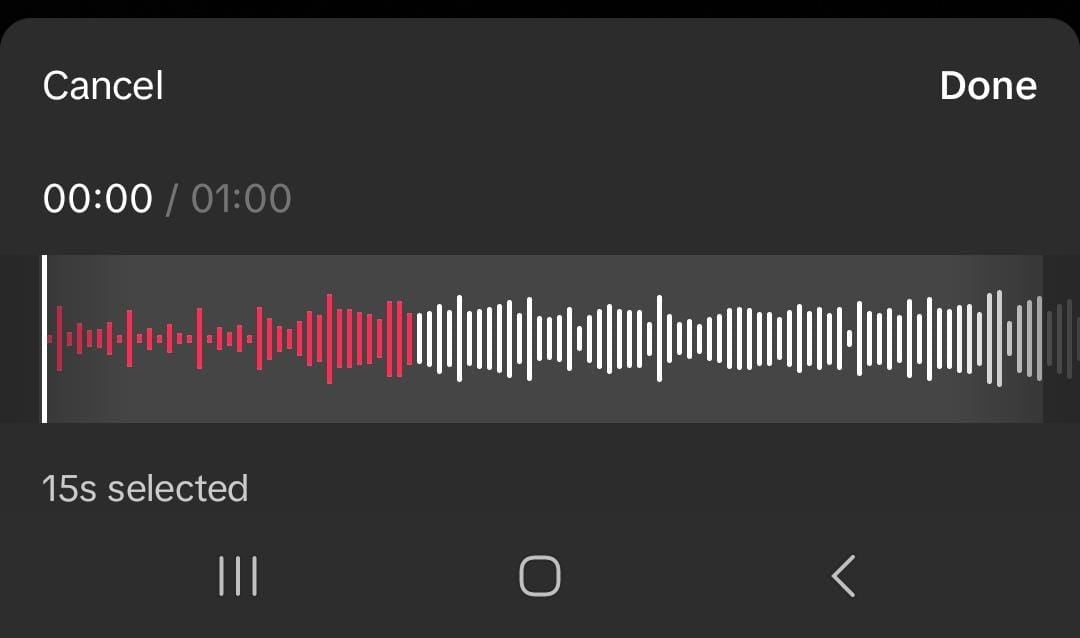
To do this, click on the song’s name at the top of your screen. Then, the bottom of your screen will display your chosen song. Tap the scissor icon and slide the playback to change the part of the song. Click “Done” once you have finished editing.
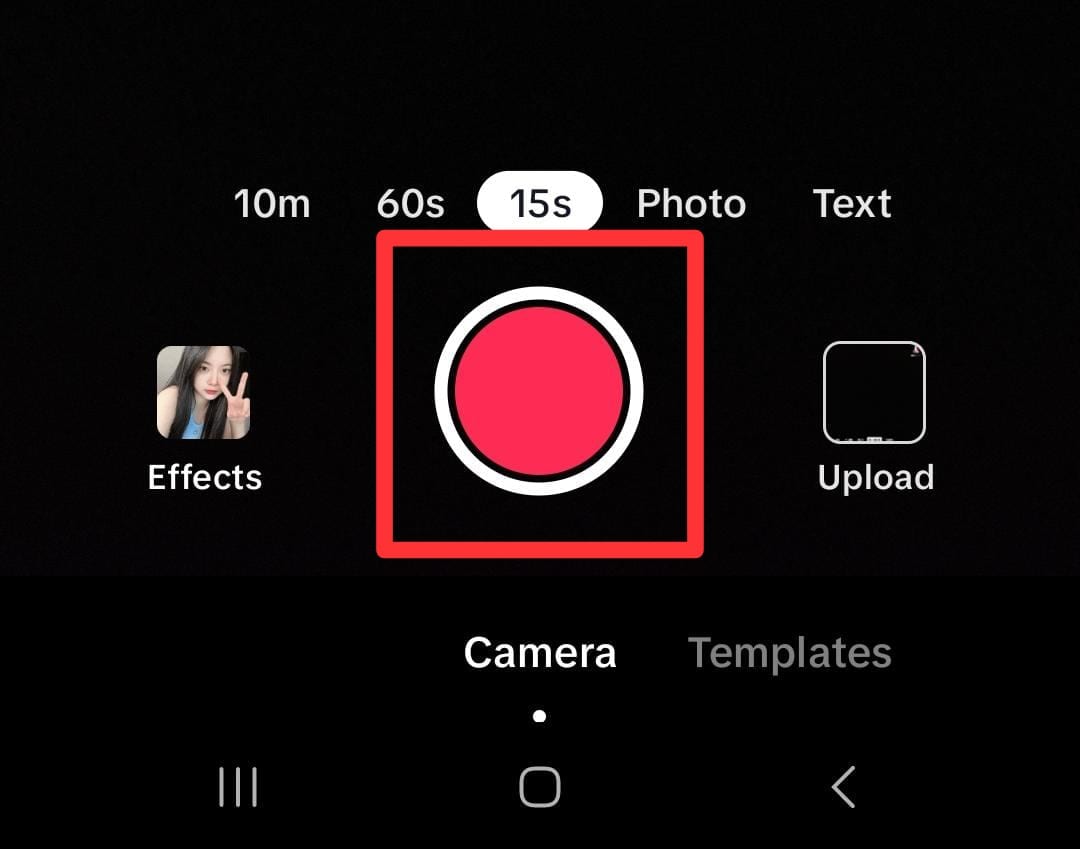
- Step 5. Tap on the red button.
If you are ready to record, tap the red button at the bottom of your screen. Then TikTok will play the chosen part of the song and record your lip-sync simultaneously. You can pause and continue the recording by clicking the same red button.
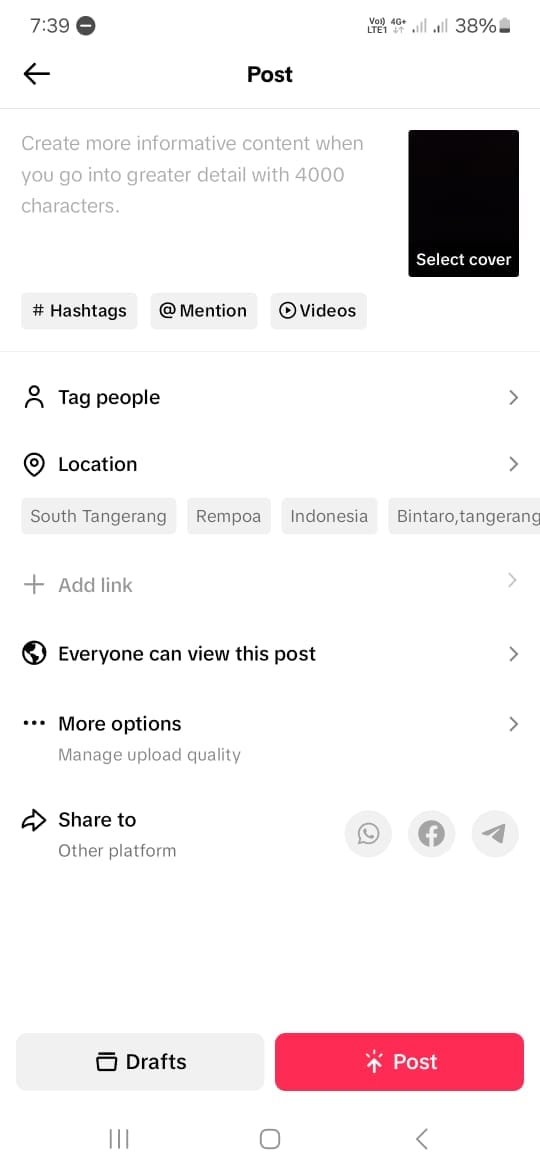
- Step 6. Post the video.
If you are satisfied with the results of your edits, click Next to proceed to the posting stage. Here, you can write a description and any other information you want. Click Post to share your lip-sync video to TikTok.
Creating a video on TikTok by lip-syncing is a fun and creative way to express yourself and connect with others. By following the steps above, you can create a lip-sync video on the TikTok app with ease. Keep in mind that by using these steps, you need to memorize the sentences and understand the beat of the chosen songs.
Part 3. How to Make Lip Sync Video Without Memorizing the Words
Making a **TikTok lip-sync video can be challenging because you must remember and match the words with the music. But there are three simple methods to make it easier.
Method 1: Record at slower speed
You can slow the speed down while recording instead of trying to keep up with the song. This technique lets you hear, understand, and follow the words more easily.
Here’s how to slow down the recording:
- Step 1. Follow steps 1 to 4 from the step-by-step guide in Part 2.
Start by following the first to fourth steps from the guide in Part 2 above.
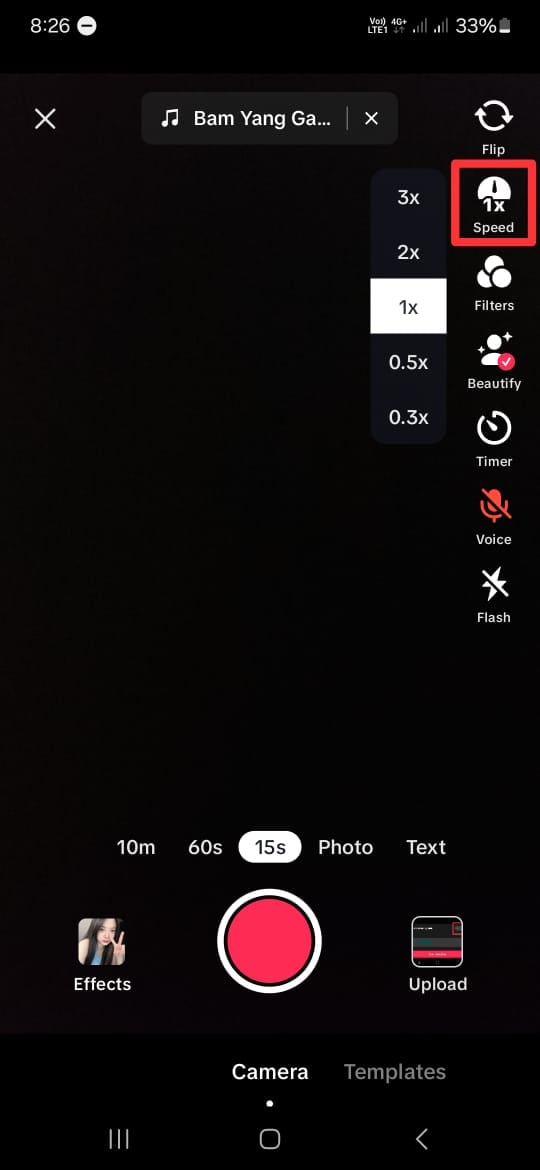
- Step 2. Set the speed record slower.
On the recording screen, click on the Speed icon on the right side of the screen. To make it slower, choose 2x or 3x. This step will make your recording time 2 or 3 times longer than it should be.
- Step 3. Tap on the red button.
Once you tap the red button, TikTok will play the song slower and record your lip-sync simultaneously. Repeat this step to help you memorize the lyrics and the beat of the songs.
Once you’re comfortable, switch back to normal speed for the final recording. This method will save time and improve accuracy.
Method 2: Purposely delay mouthing the words
While lip-syncing videos may vary in style and pacing, this technique can prove particularly useful for slower rhythms. Moreover, mastering the art of mouth sync on TikTok can elevate the overall production value of lip-syncing videos.
Using the timer feature will give you a slight lag between lip movements and audio playback. Then, it lets creators ensure more precise synchronization during editing. Here’s how to lip-sync on TikTok more easily:
- Step 1. Follow steps 1 to step 4 from the step-by-step guide in Part 2.
Like Method 1, you can start by following the first to fourth steps from the guide in Part 2 above.
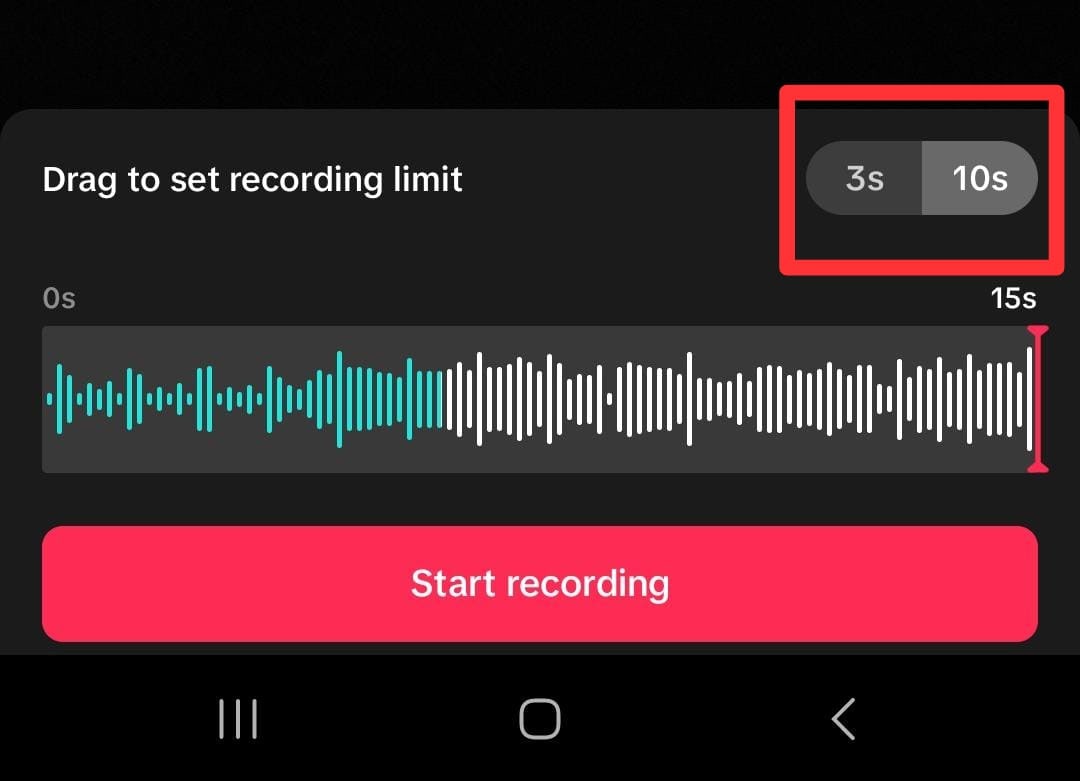
- Step 2. Delay the recording
On the recording screen, click on the Timer icon on the right side of the screen. Here, you can set the timer to 3 to 10 seconds to delay the recording’s start. You can also drag and set the recording limit if you want.
- Step 3. Start the recording
Then click “Start recording” to record the video with the timer on.
Method 3: Use a Photo Talking Tool
Next, consider using a Talking Photo feature by Wondershare Virbo. This method is for you who want to create engaging TikTok lip-sync videos without memorizing the words.
Virbo’s Talking Photo feature tool lets you upload a portrait of your photo and then make it appear as though it is speaking along with the audio. You do not have to install the app because you can use this feature online on their official website.
Here’s how to use Wondershare Virbo - Photo Talking feature to create a TikTok lip-sync video:
- Step 1. Start a new project.
Open the Wondershare Virbo website and tap the talking photo function to start a new project.
Get Started Online Free Download
- Step 2. Upload a portrait.
Tap “Upload Photo”, then upload a picture you want to use by following the instructions.
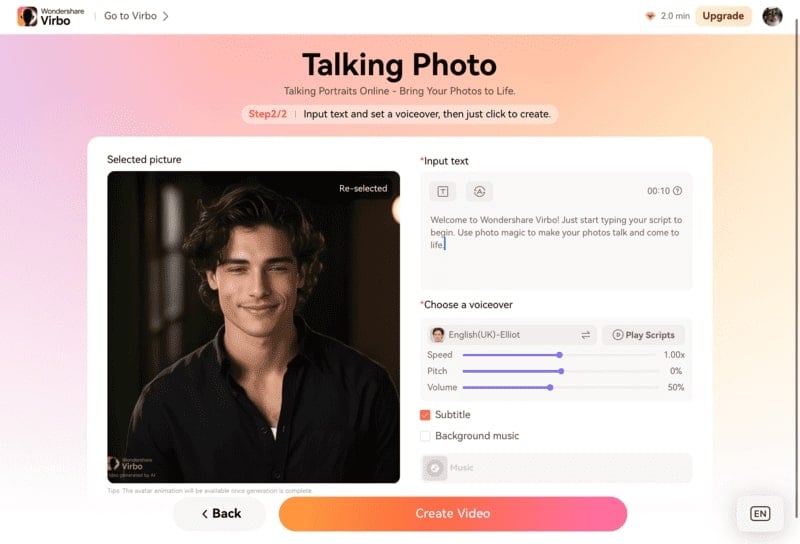
- Step 3. Edit and export.
Insert the text and adjust the voice settings. If you want to insert your own audio, you can use Wondershare Virbo for mobile or Desktop to upload or record your audio. Then, tap “Generate Video” to export.
Now, you have successfully made your own TikTok lip-sync video. You can upload it to TikTok and share it with your followers. For more detailed instructions, you can see how to use Virbo’s Photo Talking tool .
Part 4: How To Lipsync Your Video to Any Language Using AI Video Translator
In today’s globalized world, reaching audiences in different languages is important for effective communication. Thanks to technological advancements, there is a tool that can help you translate video content.
Wondershare Virbo – Video Translator offers seamless solutions to translate video content into various languages with AI. Virbo ensures high-quality translations that maintain the integrity and impact of your original message.
How to lipsync TikTok videos to any language with Wondershare Virbo - Video Translator:
- Step 1. Go to Virbo’s official website , then click Generate AI Video Online.

Get Started Online Free Download
- Step 2. Log in or create an account.

- Step 3. Then, navigate to the Video Translator tool on the Virbo’s homepage.
- Step 4. Upload the video.
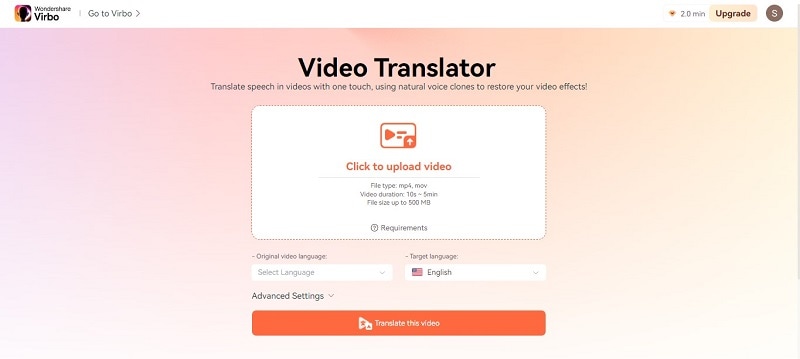
Once inside the Video Translator interface, upload the video file you wish to translate. Select the original video language and the preferred target language from the available options. Additionally, enable the Lip Sync feature to ensure that the translated audio aligns perfectly with the lip movements in the video.
- Step 5. Click “Translate this video” to start translating the video.
Virbo’s Video Translator will use its advanced algorithms to translate the audio and synchronize it with the video seamlessly. Depending on the length and complexity of the video, the translation process may take some time.
Conclusion
Lip-syncing on TikTok has become a significant aspect of TikTok culture. It helps users show their creativity, entertain people, and maybe even become famous. Making **mouth sync TikTok videos usually means remembering lines and matching them to music, but there’s an easier way with Wondershare Virbo’s Talking Photo tool. This tool allows you to upload a portrait and sync it with audio without remembering the lines.
Also, Wondershare Virbo has a Video Translator tool that allows you to translate videos seamlessly into any language. This translator tool helps you communicate with people worldwide and maintain the original message.
TikTok has transformed the social media landscape through its short-form video content. They encourage users to make creative content using popular audio clips. Which enables them to entertain, gain recognition, and contribute to the platform.
Lip-syncing is a big part of what makes TikTok popular. Many users post lip-syncing videos that imitate voices from songs, movies, or trending audio clips. This art of lip-syncing has become an essential element of TikTok’s culture. Now, you might wonder **how to lip-sync on TikTok videos. This article will teach us how to make it effortlessly.
Part 1. Why Do People Lip Sync on TikTok?
Lip-syncing involves mimicking the words or vocals of an existing audio track. TikTok users take this concept to new heights by lip-syncing popular songs or clips. Lip-sync is appealing because it lets people get creative and reach a large audience.
Here are a few reasons why people engage in **lip sync TikTok:
- Self-expression: Lip-sync allows users to embody their favorite artists or characters by showcasing their personality and creativity.
- Entertainment: Many users lip-sync to entertain followers. They offer comedic performances, heartfelt renditions, or engaging storytelling.
- Virality: TikTok’s algorithm favors engaging content and well-executed lip-sync videos. They have the potential to go viral, rapidly gaining likes, shares, and followers.
Part 2. How to Make Lip Sync Video on TikTok
Here’s the step-by-step guide on how to lip sync on TikTok and captive your followers:
- Step 1. Open the TikTok app and tap the “+” button.
Start with opening the TikTok app on your phone. Then, tap the “+” button at the bottom of your screen to make a new video.
- Step 2. Add a song that you want to lip-sync to.
Next, click “Add Sound” with the musical note icon at the top of the screen. If you have a specific song in mind, you can find it by searching it on the search tab. Then, tap the song and click the check icon beside it.
- Step 3. Choose the duration and the part of the song.
After choosing the song you want, you will return to the recording screen. Here, select your video duration at the bottom of the screen. You can choose between 10 minutes, 60 seconds, and 15 seconds. Remember that the duration of the songs on TikTok is usually only 30 to 60 seconds.
- Step 4. Choose the part of the song.
TikTok allows you to change the part of the song when lip-sync. However, the duration of the video should be less than the duration of the chosen song.
To do this, click on the song’s name at the top of your screen. Then, the bottom of your screen will display your chosen song. Tap the scissor icon and slide the playback to change the part of the song. Click “Done” once you have finished editing.
- Step 5. Tap on the red button.
If you are ready to record, tap the red button at the bottom of your screen. Then TikTok will play the chosen part of the song and record your lip-sync simultaneously. You can pause and continue the recording by clicking the same red button.
- Step 6. Post the video.
If you are satisfied with the results of your edits, click Next to proceed to the posting stage. Here, you can write a description and any other information you want. Click Post to share your lip-sync video to TikTok.
Creating a video on TikTok by lip-syncing is a fun and creative way to express yourself and connect with others. By following the steps above, you can create a lip-sync video on the TikTok app with ease. Keep in mind that by using these steps, you need to memorize the sentences and understand the beat of the chosen songs.
Part 3. How to Make Lip Sync Video Without Memorizing the Words
Making a **TikTok lip-sync video can be challenging because you must remember and match the words with the music. But there are three simple methods to make it easier.
Method 1: Record at slower speed
You can slow the speed down while recording instead of trying to keep up with the song. This technique lets you hear, understand, and follow the words more easily.
Here’s how to slow down the recording:
- Step 1. Follow steps 1 to 4 from the step-by-step guide in Part 2.
Start by following the first to fourth steps from the guide in Part 2 above.
- Step 2. Set the speed record slower.
On the recording screen, click on the Speed icon on the right side of the screen. To make it slower, choose 2x or 3x. This step will make your recording time 2 or 3 times longer than it should be.
- Step 3. Tap on the red button.
Once you tap the red button, TikTok will play the song slower and record your lip-sync simultaneously. Repeat this step to help you memorize the lyrics and the beat of the songs.
Once you’re comfortable, switch back to normal speed for the final recording. This method will save time and improve accuracy.
Method 2: Purposely delay mouthing the words
While lip-syncing videos may vary in style and pacing, this technique can prove particularly useful for slower rhythms. Moreover, mastering the art of mouth sync on TikTok can elevate the overall production value of lip-syncing videos.
Using the timer feature will give you a slight lag between lip movements and audio playback. Then, it lets creators ensure more precise synchronization during editing. Here’s how to lip-sync on TikTok more easily:
- Step 1. Follow steps 1 to step 4 from the step-by-step guide in Part 2.
Like Method 1, you can start by following the first to fourth steps from the guide in Part 2 above.
- Step 2. Delay the recording
On the recording screen, click on the Timer icon on the right side of the screen. Here, you can set the timer to 3 to 10 seconds to delay the recording’s start. You can also drag and set the recording limit if you want.
- Step 3. Start the recording
Then click “Start recording” to record the video with the timer on.
Method 3: Use a Photo Talking Tool
Next, consider using a Talking Photo feature by Wondershare Virbo. This method is for you who want to create engaging TikTok lip-sync videos without memorizing the words.
Virbo’s Talking Photo feature tool lets you upload a portrait of your photo and then make it appear as though it is speaking along with the audio. You do not have to install the app because you can use this feature online on their official website.
Here’s how to use Wondershare Virbo - Photo Talking feature to create a TikTok lip-sync video:
- Step 1. Start a new project.
Open the Wondershare Virbo website and tap the talking photo function to start a new project.
Get Started Online Free Download
- Step 2. Upload a portrait.
Tap “Upload Photo”, then upload a picture you want to use by following the instructions.
- Step 3. Edit and export.
Insert the text and adjust the voice settings. If you want to insert your own audio, you can use Wondershare Virbo for mobile or Desktop to upload or record your audio. Then, tap “Generate Video” to export.
Now, you have successfully made your own TikTok lip-sync video. You can upload it to TikTok and share it with your followers. For more detailed instructions, you can see how to use Virbo’s Photo Talking tool .
Part 4: How To Lipsync Your Video to Any Language Using AI Video Translator
In today’s globalized world, reaching audiences in different languages is important for effective communication. Thanks to technological advancements, there is a tool that can help you translate video content.
Wondershare Virbo – Video Translator offers seamless solutions to translate video content into various languages with AI. Virbo ensures high-quality translations that maintain the integrity and impact of your original message.
How to lipsync TikTok videos to any language with Wondershare Virbo - Video Translator:
- Step 1. Go to Virbo’s official website , then click Generate AI Video Online.
Get Started Online Free Download
- Step 2. Log in or create an account.
- Step 3. Then, navigate to the Video Translator tool on the Virbo’s homepage.
- Step 4. Upload the video.
Once inside the Video Translator interface, upload the video file you wish to translate. Select the original video language and the preferred target language from the available options. Additionally, enable the Lip Sync feature to ensure that the translated audio aligns perfectly with the lip movements in the video.
- Step 5. Click “Translate this video” to start translating the video.
Virbo’s Video Translator will use its advanced algorithms to translate the audio and synchronize it with the video seamlessly. Depending on the length and complexity of the video, the translation process may take some time.
Conclusion
Lip-syncing on TikTok has become a significant aspect of TikTok culture. It helps users show their creativity, entertain people, and maybe even become famous. Making **mouth sync TikTok videos usually means remembering lines and matching them to music, but there’s an easier way with Wondershare Virbo’s Talking Photo tool. This tool allows you to upload a portrait and sync it with audio without remembering the lines.
Also, Wondershare Virbo has a Video Translator tool that allows you to translate videos seamlessly into any language. This translator tool helps you communicate with people worldwide and maintain the original message.
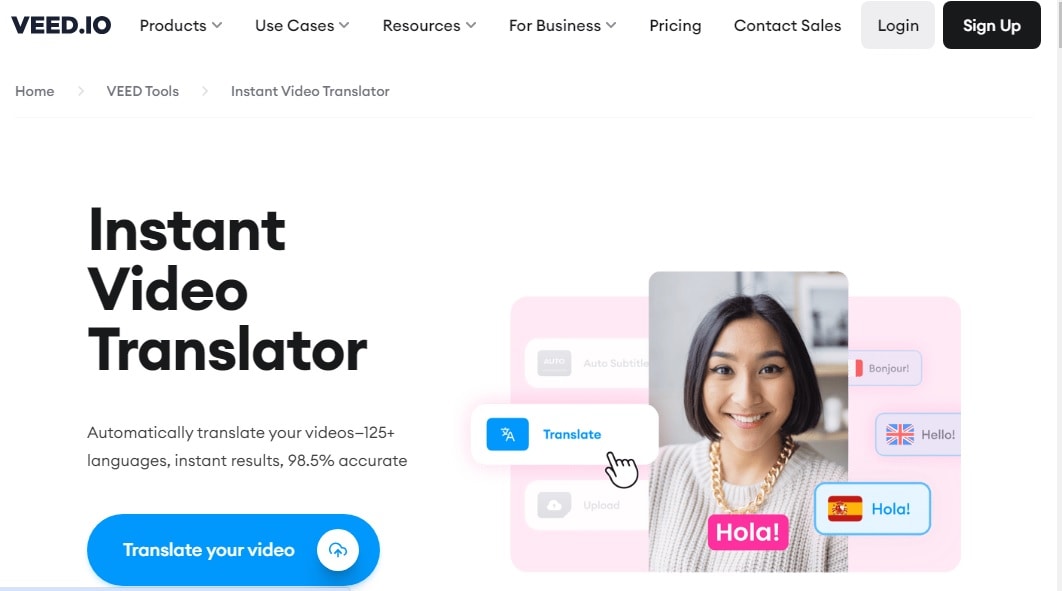
A Comprehensive Guide to Video and Subtitle Translation with Veed.io
If you are a multilingual content creator, having a tool like Veed in your arsenal can be pretty useful. It can quickly and accurately translate your videos online. Such translated content can allow you to reach a much wider audience and engage with them in a better way. It’s a powerful tool that can simplify the process of adding subtitles, transcriptions, and translations to your video content. In this article, we will explain how you can utilize Veed io translate feature to stay on top of your game.
Part 1. Veed Translate: Unlocking Language Diversity
Translating videos and adding captions to your YouTube videos makes your content more accessible. You can make content suitable for more social platforms and engage even more audiences. Below are some useful tips for unlocking language diversity with the Veed video translate feature.
Seamless integration with YouTube and other social media platforms
Veed supports seamless integration with all popular social media platforms. With this tool, you can import your videos from YouTube for quick translation, share your translated video directly to Facebook, optimize your video content for TikTok, and do so much more. This ensures you can optimize your content for maximum social media engagement and reach a wider audience.
Contextually relevant and accurate translations
Veed has a fantastic 98.5% accuracy rate when it comes to translations. This means Veed is actually a great alternative to tools like Google Translate that don’t always provide contextually relevant output. It automatically transcribes the audio in your videos into simple text. Afterwards, it synchronizes the generated text with your videos, ensuring accurate and well-timed translations.
Fantastic Editing Tools
Veed gives you complete creative control over the type of content you want to produce and how. It offers a range of editing tools to enhance your video creation process. For instance, it lets you change and customize the font style. You can use fun fonts, spacing, size, colors, etc. You can also add animations and visuals, incorporate templates and do so much more.
Multi-language support and translation service
Veed supports multiple languages. To be more specific, Veed translations are available in 125+ different languages of the world. This makes it easy for you to reach a global audience by creating content that resonates with a diverse audience.
Professional quality output with easy sharing options
Once you are done with your video, you can export it in multiple different formats. For instance, it supports SRT and VTT subtitle files. You can export the text as an SRT file for easy sharing and upload on other platforms, including social media, websites and podcasts etc. There’s also a screen recording option which lets you create pro-grade videos with the help of voiceovers and CC feature.
Generate Engaging
AI Video in Minutes!
Easily convert text into professional spokesperson videos in over 120+ voices & languages in minutes.
Generate AI Video Free Generate AI Video Now


Part 2. Veed.io Translate Video: Step-by-Step Tutorial
Let’s take a look now at the step-by-step tutorial to translate a video with Veed. Note: For this Veed io translate guide, we will be translating a video using Veed on mobile.
Step 1 Launch Veed and Import Your Video
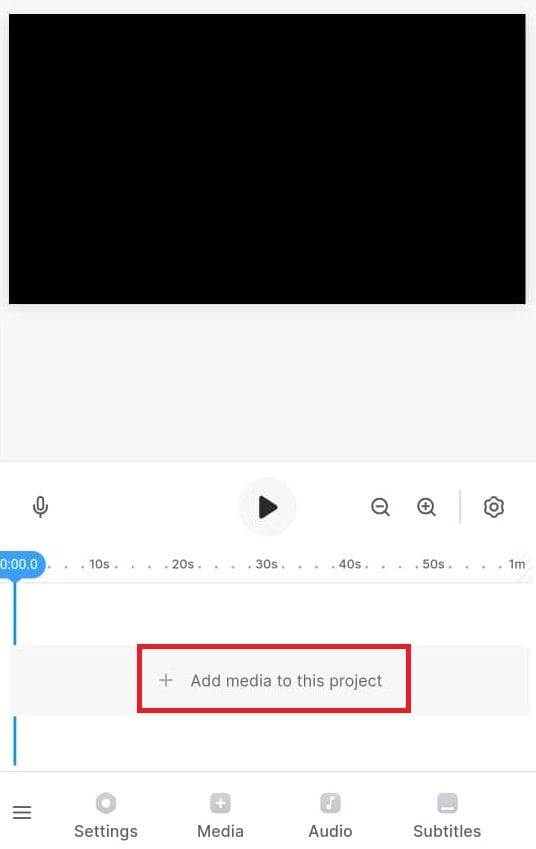
Start Veed and click on the big Add media to this project button you see in the middle. You can add audio, video, or subtitle files to the Veed platform and edit them if you want.
Step 2 Go To Project Settings
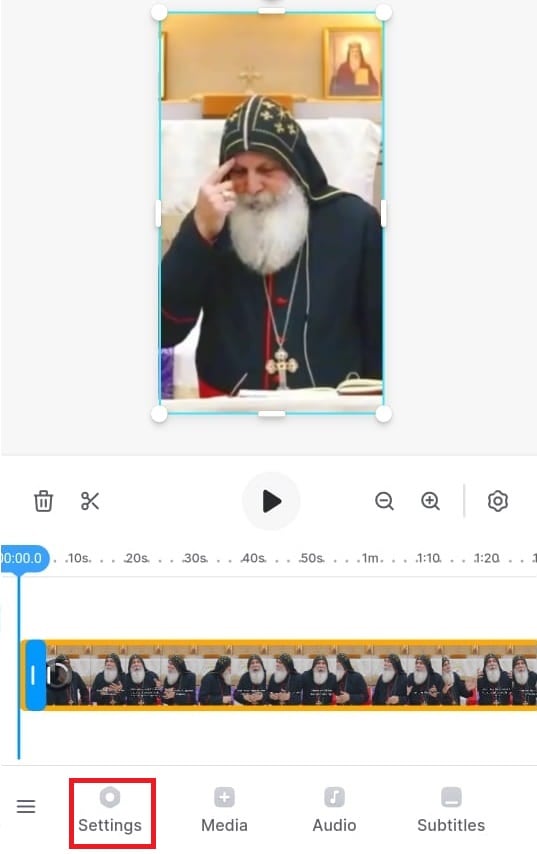
Next, go to your project’s settings by clicking the Settings button on the bottom left corner of the screen.
Step 3 Translate your Voice
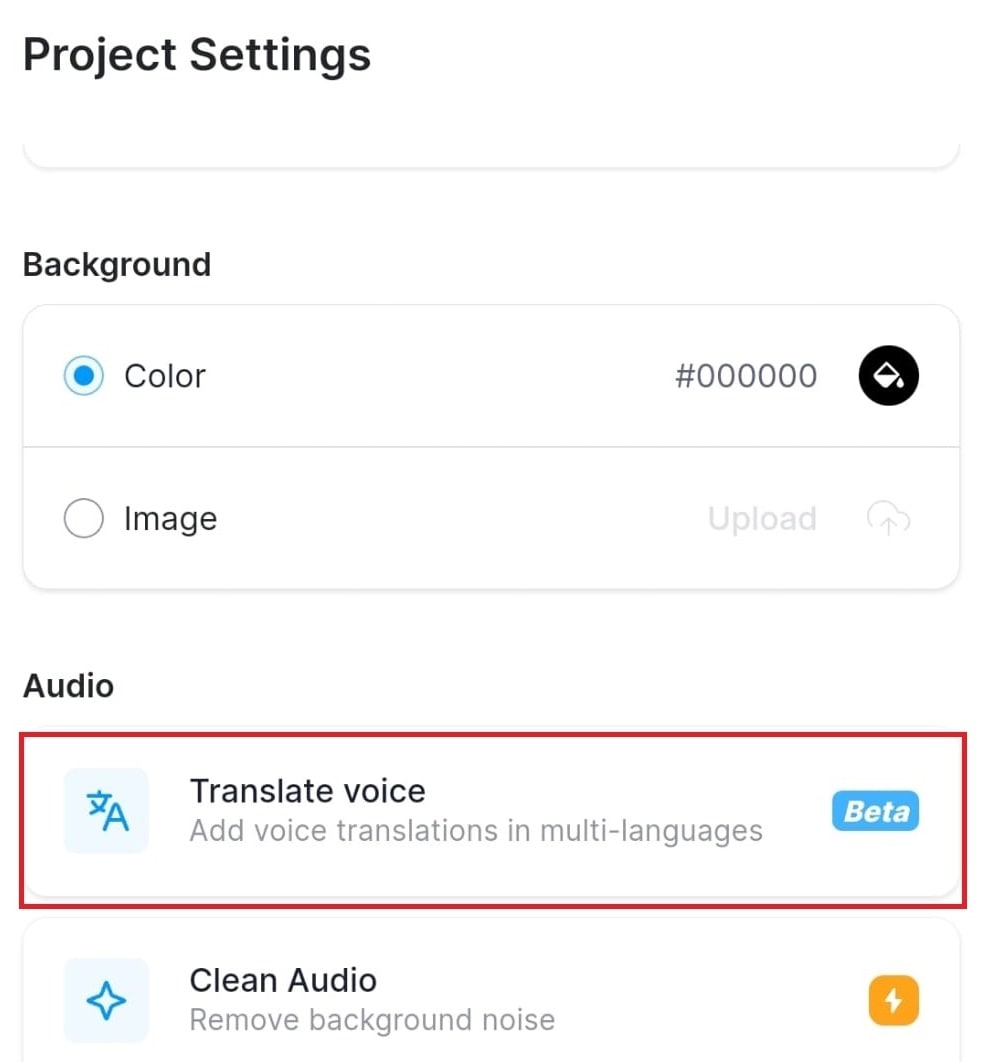
Next, click on the Translate Voice button. Note: Veed supports multiple languages. It lets you translate and then add these translations in multiple languages.
Step 4 Check Your Translation Settings
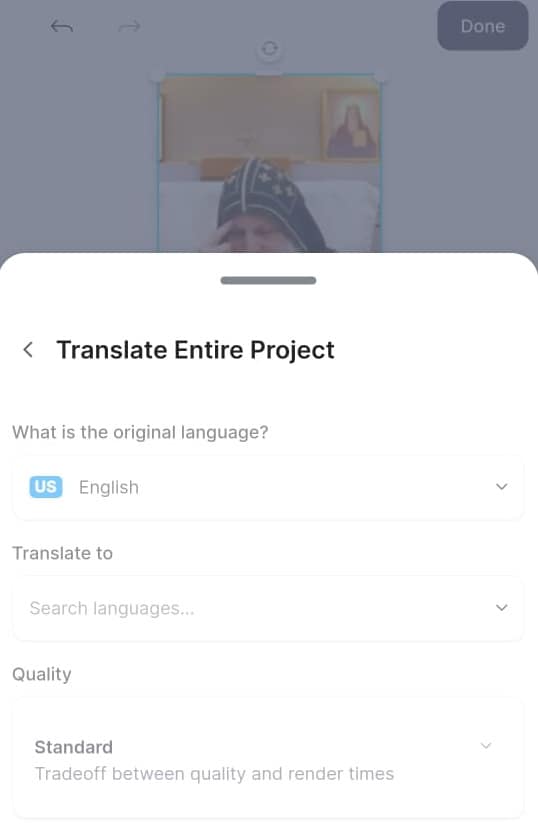
Veed automatically detects the language in the video. So, take a look at all the other settings, like the language you want to translate into and content quality and click Translate. Veed will start generating the translation in your preferred language.
Part 3: The Best Alternative to Veed.io
If you are not satisfied with the features of Veed.io, we have a better solution for you. Wondershare Virbo will prove to be the best alternative to theVeed.io translation tool. Using this advanced tool, you can select from multiple languages to get the desired translations. To carry out the translation process, you can import videos in two different formats, MP4 and MOV.
Other than video translation, users will also be able to carry out subtitle translations using this tool. Plus, this tool offers much more than translation capabilities. You can also utilize this Veed.io translate video alternative to create customized AI videos for different purposes.
Key Features of Wondershare Virbo
- Users will be able to use the lip-sync feature to create translated narrations that match the video.
- Using its talking photo functionality, you can add AI voiceovers in any language to your photos.
- Virbo provides you with an AI script feature to generate writings in multiple languages.
Advantages
- Veed.io provides very restricted minutes of translation under its subscription plans compared to Wondershare Virbo.
- Using the online version of Wondershare Virbo, you can proofread and edit the translated script.
- Veed.io is not available for offline use in Windows operating systems. However, Virbo delivers an efficient offline platform for video translation.
Translate Video Online Download APP Now Free Download
How to Translate Videos With This Veed.io Alternative
You have understood how Virbo is better than the Veed.io translation tool. Let’s analyze the method you can use to translate videos using this tool.
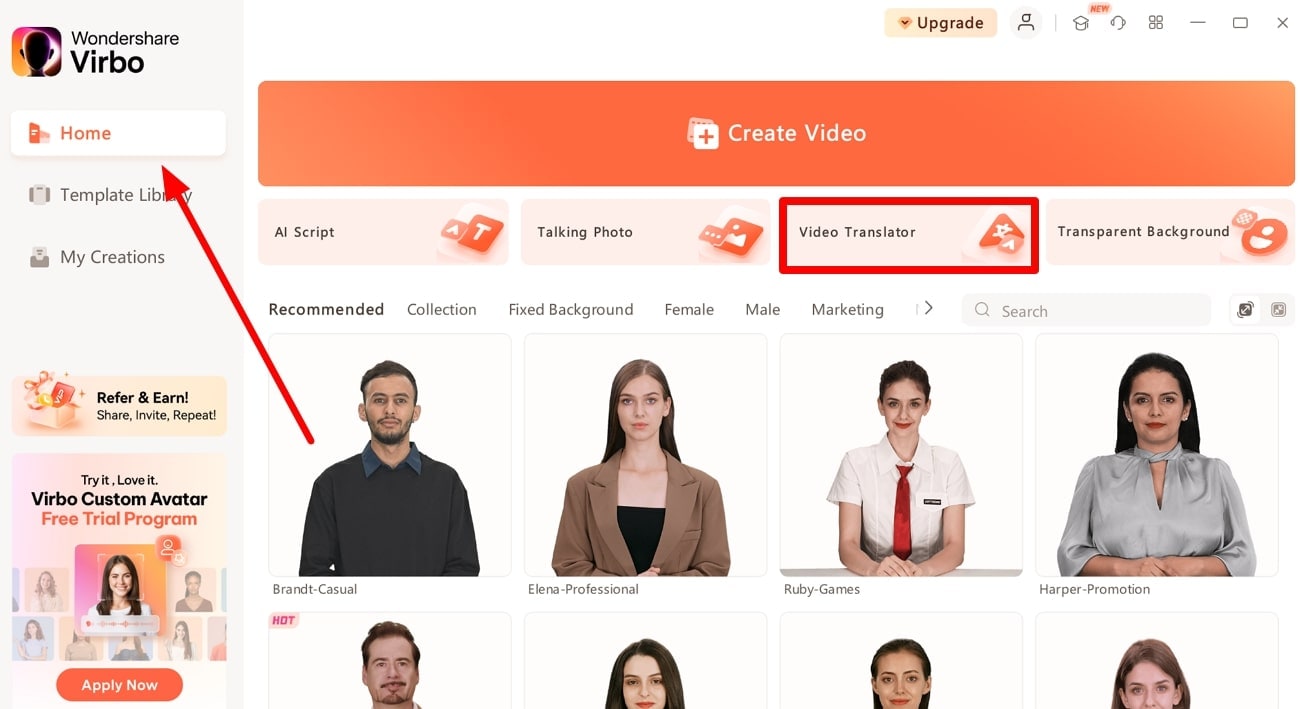
Step 1 Enter the Video Translator Feature from the Home Tab
Once you download Virbo from its official website, launch this Veed.io alternative on your computer. Next, hit the “Video Translator” button from its main interface after accessing the “Home” tab.
Step 2 Import Your Video to Start the Video Translation Process
Upon entering this feature, click on the “Click to Upload Video” option to add your desired video to the tool. However, there is only an option to import MP4 or MOV videos that are under 5 minutes in length.
Step 3 Choose the Original and Translated Languages
After importing the video, select the original language of your video from the “Original Language” dropdown menu. Afterward, access the “Translated Language” dropdown menu to choose your desired translation language.
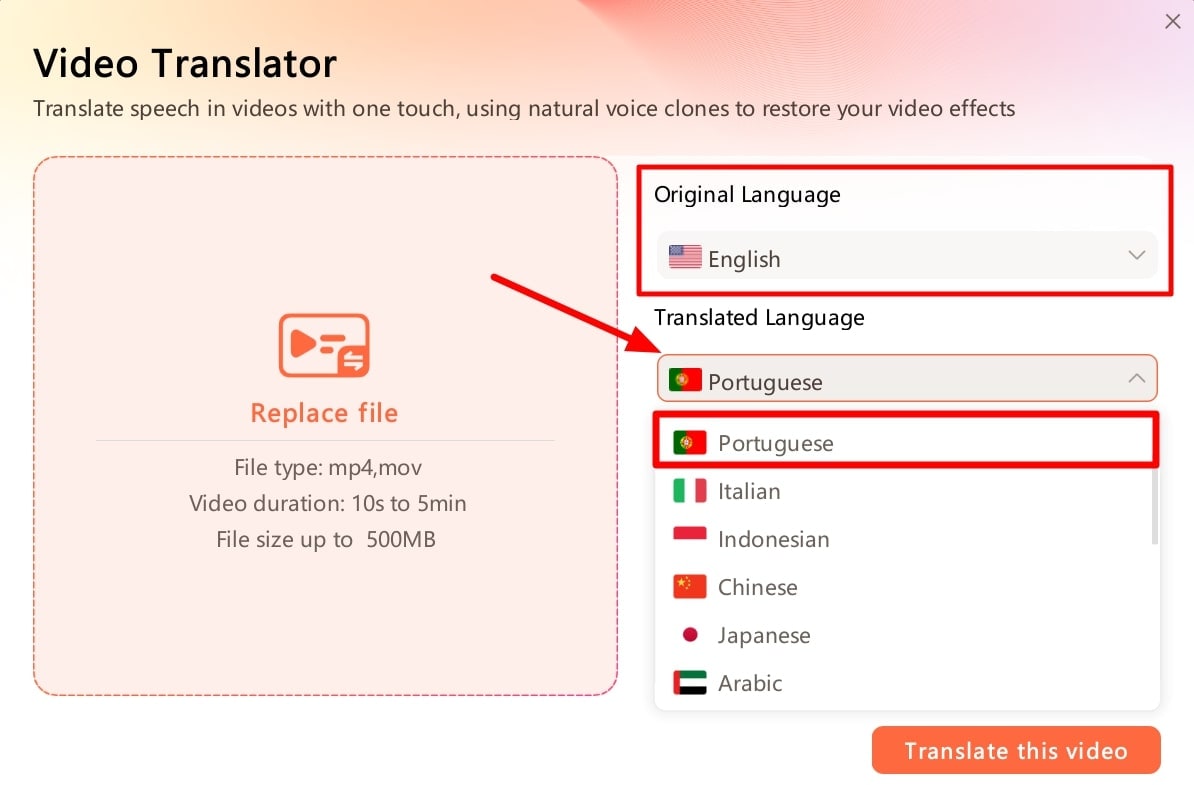
Step 4 Optimize the Advanced Video Translation Settings
Now, you can adjust the advanced settings for your video translation process. For this purpose, turn on the Subtitle option to get the video subtitles translated along with the audio. Also, enable the Lip-Sync option to generate translated audios that align with the video. Finally, hit the Translate This Video button to get your desired translated video.

Translate Video Online Download APP Now Free Download
Part 4. FAQs about Veed.io Subtitle Translation
1. How can I easily translate a video into English or any other language?
You can easily translate a video to 125+ languages of the world, including English, with an online video translator like Veed or Wondershare Virbo.
2. Are Veed translations accurate?
Veed has an accuracy percentage of 98.5, which is fantastic for an online tool. In fact, it is higher than many translation software out there.
3. Can I translate an audio file with Veed?
Yes, of course! You can easily upload any audio file in mp3 format to Veed. It will automatically translate and let you download the text file.
4. How can I download my content after it has been translated?
Simply click on the Download button when you finish the translation process. It takes just one click!
5. What makes Veed different from others?
Veed has many one-click features. For instance, auto subtitles, translations, social media formatting, templates, video compression, etc are all available in one simple click.
6. Can Veed translate subtitles?
Yes, Veed also supports translating subtitles. Simply upload your subtitle file in SRT format and leave the rest to Veed. Veed io subtitle translationis just as accurate as its video translation feature.
7. Is Veed good for editing?
Veed has many exceptional features that make content creation easy. But, it cannot replace a full-fledged video editor or help you create a new video from scratch. This is its biggest disadvantage. If you want to create a video, you can try to use Wondershare Virbo.
Conclusion
All said, Veed is a fantastic tool that makes translation into multiple languages as easy as possible. You can use the Veed translate feature to translate your video content into 125+ languages of the world, making it accessible to a larger audience. Videos in local languages get more engagement than those without because people can closely relate with the content. By adding captions in other languages, you can engage audiences from those countries, Veed supports an extensive range of content creators with their creative projects. What should you do if you want to create a video from scratch or want to try another alternative to translate video? Just try Wondershare Virbo!
Translate Video Online Download APP Now Free Download
Easily convert text into professional spokesperson videos in over 120+ voices & languages in minutes.
Generate AI Video Free Generate AI Video Now
Part 2. Veed.io Translate Video: Step-by-Step Tutorial
Let’s take a look now at the step-by-step tutorial to translate a video with Veed. Note: For this Veed io translate guide, we will be translating a video using Veed on mobile.
Step 1 Launch Veed and Import Your Video
Start Veed and click on the big Add media to this project button you see in the middle. You can add audio, video, or subtitle files to the Veed platform and edit them if you want.
Step 2 Go To Project Settings
Next, go to your project’s settings by clicking the Settings button on the bottom left corner of the screen.
Step 3 Translate your Voice
Next, click on the Translate Voice button. Note: Veed supports multiple languages. It lets you translate and then add these translations in multiple languages.
Step 4 Check Your Translation Settings
Veed automatically detects the language in the video. So, take a look at all the other settings, like the language you want to translate into and content quality and click Translate. Veed will start generating the translation in your preferred language.
Part 3: The Best Alternative to Veed.io
If you are not satisfied with the features of Veed.io, we have a better solution for you. Wondershare Virbo will prove to be the best alternative to theVeed.io translation tool. Using this advanced tool, you can select from multiple languages to get the desired translations. To carry out the translation process, you can import videos in two different formats, MP4 and MOV.
Other than video translation, users will also be able to carry out subtitle translations using this tool. Plus, this tool offers much more than translation capabilities. You can also utilize this Veed.io translate video alternative to create customized AI videos for different purposes.
Key Features of Wondershare Virbo
- Users will be able to use the lip-sync feature to create translated narrations that match the video.
- Using its talking photo functionality, you can add AI voiceovers in any language to your photos.
- Virbo provides you with an AI script feature to generate writings in multiple languages.
Advantages
- Veed.io provides very restricted minutes of translation under its subscription plans compared to Wondershare Virbo.
- Using the online version of Wondershare Virbo, you can proofread and edit the translated script.
- Veed.io is not available for offline use in Windows operating systems. However, Virbo delivers an efficient offline platform for video translation.
Translate Video Online Download APP Now Free Download
How to Translate Videos With This Veed.io Alternative
You have understood how Virbo is better than the Veed.io translation tool. Let’s analyze the method you can use to translate videos using this tool.
Step 1 Enter the Video Translator Feature from the Home Tab
Once you download Virbo from its official website, launch this Veed.io alternative on your computer. Next, hit the “Video Translator” button from its main interface after accessing the “Home” tab.
Step 2 Import Your Video to Start the Video Translation Process
Upon entering this feature, click on the “Click to Upload Video” option to add your desired video to the tool. However, there is only an option to import MP4 or MOV videos that are under 5 minutes in length.
Step 3 Choose the Original and Translated Languages
After importing the video, select the original language of your video from the “Original Language” dropdown menu. Afterward, access the “Translated Language” dropdown menu to choose your desired translation language.
Step 4 Optimize the Advanced Video Translation Settings
Now, you can adjust the advanced settings for your video translation process. For this purpose, turn on the Subtitle option to get the video subtitles translated along with the audio. Also, enable the Lip-Sync option to generate translated audios that align with the video. Finally, hit the Translate This Video button to get your desired translated video.
Translate Video Online Download APP Now Free Download
Part 4. FAQs about Veed.io Subtitle Translation
1. How can I easily translate a video into English or any other language?
You can easily translate a video to 125+ languages of the world, including English, with an online video translator like Veed or Wondershare Virbo.
2. Are Veed translations accurate?
Veed has an accuracy percentage of 98.5, which is fantastic for an online tool. In fact, it is higher than many translation software out there.
3. Can I translate an audio file with Veed?
Yes, of course! You can easily upload any audio file in mp3 format to Veed. It will automatically translate and let you download the text file.
4. How can I download my content after it has been translated?
Simply click on the Download button when you finish the translation process. It takes just one click!
5. What makes Veed different from others?
Veed has many one-click features. For instance, auto subtitles, translations, social media formatting, templates, video compression, etc are all available in one simple click.
6. Can Veed translate subtitles?
Yes, Veed also supports translating subtitles. Simply upload your subtitle file in SRT format and leave the rest to Veed. Veed io subtitle translationis just as accurate as its video translation feature.
7. Is Veed good for editing?
Veed has many exceptional features that make content creation easy. But, it cannot replace a full-fledged video editor or help you create a new video from scratch. This is its biggest disadvantage. If you want to create a video, you can try to use Wondershare Virbo.
Conclusion
All said, Veed is a fantastic tool that makes translation into multiple languages as easy as possible. You can use the Veed translate feature to translate your video content into 125+ languages of the world, making it accessible to a larger audience. Videos in local languages get more engagement than those without because people can closely relate with the content. By adding captions in other languages, you can engage audiences from those countries, Veed supports an extensive range of content creators with their creative projects. What should you do if you want to create a video from scratch or want to try another alternative to translate video? Just try Wondershare Virbo!
Translate Video Online Download APP Now Free Download
Also read:
- 2024 Approved Pro Audio Recording Excellence with Audacity
- 効果的にトキオモーションビデオを記録するための手順
- How to Transfer Photos from Infinix Note 30 VIP Racing Edition to Laptop Without USB | Dr.fone
- In 2024, Elevate Video Decks Smart Description Templates
- In 2024, How Burst Mode Enhances GoPro Videos
- In 2024, How To Translate Videos in Tamil for a Wider Reach
- In 2024, Pinnacle 6 Services to Translate Videos
- New In 2024, Maximize Yandex Translate in Video Translation and Beyond
- New In 2024, Top 10 AI Subtitle Translators for Content Creators
- The Best AI Translator to Translate Videos Online
- The Easiest Methods to Hard Reset Vivo Y17s | Dr.fone
- Updated In 2024, How To Easily Use Korean to English Video Translators
- Updated In 2024, Must-Have Apps for Real-Time Video Translation
- Title: Updated Best Tool to Translate YouTube Video to Arabic for 2024
- Author: Susan
- Created at : 2024-12-03 17:25:16
- Updated at : 2024-12-09 17:06:56
- Link: https://ai-video-translation.techidaily.com/updated-best-tool-to-translate-youtube-video-to-arabic-for-2024/
- License: This work is licensed under CC BY-NC-SA 4.0.